
How to photograph food the easy way!
We assume that you are looking at the packaging of a food product with a blurry, poorly done, and badly lit photo. Would you buy it? The answer is probably no. Similarly, if you're in front of a restaurant menu and see food presented inaccurately, with distorted colors and excessive contrasts, would you feel like going in? Again, the answer is probably no. This underscores the importance of food photography, which is essential for creating appealing images of food for advertising purposes. This article will explain how to achieve a perfect food photo.
What is food photography?
In short, it's about photographing food.
However, as in any other genre of photography, simplifying it in a few words is limiting because it's not that simple. Food photography is an art that allows storytelling, giving new life, and providing a completely different dimension to the food we consume.
It's not just a hobby for Instagram but can also be a serious professional activity. It finds employment in the commercial sector (advertising), editorial, marketing (e.g., websites/social media), and many other facets.
For example, restaurants use photography to showcase dishes on their menu and for advertising. Moreover, it can be used for food packaging or order totems, but these are just a few examples...
In reality, food photography can be an extremely profitable activity. Not only because the food industry has more financial resources to invest in communication compared to the fashion industry but also because, objectively, the demand for photographic services in this field is significantly high.
Now you might be wondering, 'How do I start becoming a specialized food photographer?'

Getting into Food Photography
A great starting point is to refine your aesthetic taste and study the masters of Food photography dominating the industry.
You'll be amazed at how much your aesthetic sense can improve by examining the work of great photographers! However, it's crucial to carefully select sources to educate your eye on what is aesthetically pleasing.
Analyzing such images not only sharpens visual perception but also provides a deeper understanding of the industry's demands.
Behind the apparent simplicity of images lies a vast amount of work and study. The following tips are essential to understanding the professional approach to photographic production.
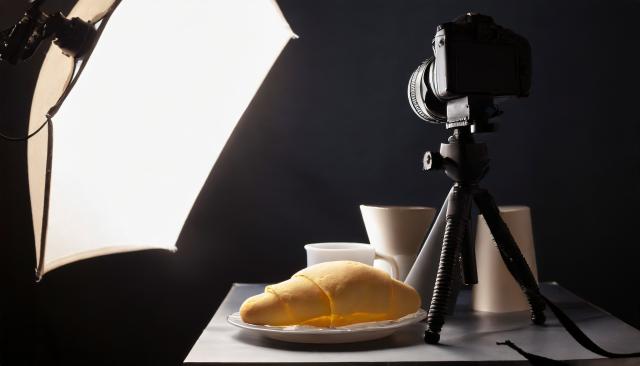
Let's start by discussing the technical aspect, examining the necessary camera and equipment requirements for food photography.
Photographic Equipment
Many people who get into food photography start using simple tools like an iPhone or a smartphone. However, if you want to take this art form seriously and aspire to become a professional, investing in a quality camera truly makes a difference.
Initially, you might consider using a camera with a cropped sensor. Not only are they more affordable, but they also allow you to understand if photography is really your calling... it's like not buying a sports car if you're not even sure you love driving, don't you think?
If you opt for a camera with a cropped sensor, keep in mind the crop factor when selecting lenses.

The Best Lenses for Food Photography
Fixed focal length lenses are often the ideal choice for food photography. This is due to their wider apertures that allow greater control over the depth of field.
Usually, fixed focal lengths like 80mm and 50mm are recommended for food photography when using a full-frame digital camera. If you're shooting with a camera equipped with a cropped sensor, you'll need to select the most suitable lens based on the camera's crop factor.
The crop factor indicates how much a camera crops the image compared to a full-frame camera, which roughly corresponds to a standard 35mm film. By multiplying the focal length of your lens by the crop factor, you get the effective focal length at which your images are taken with that camera.
Therefore, to achieve an effect similar to an 80mm lens with a camera equipped with a crop factor of 1.6, you'd need to use a 50mm lens.
Additionally, owning a macro lens can undoubtedly help you capture elusive details and create texture-rich images.
Other Necessary Equipment
In food photography, a tripod is an indispensable accessory as it helps keep the camera steady, eliminating micro-movements that can occur during handheld shots. A remote trigger for remote shooting can be very useful but not essential. If not available, you can use your camera's self-timer.
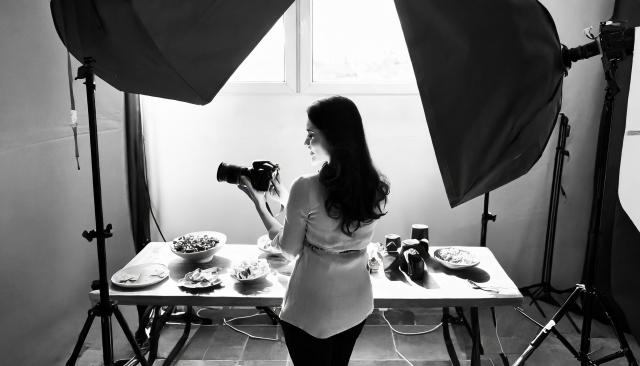
While many food photographers prefer using natural light, artificial lighting is recommended to offer greater control and better image rendering, whether you work in a studio or at client locations.
Having flash, light modifiers, diffusers, and reflectors can be useful to adjust and shape lighting as needed.
However, if you're not experienced in using lights, we suggest starting with simpler equipment: for example, a dimmable LED continuous light. This type of lighting allows you to have an immediate preview of the result, and LEDs, not overheating excessively, won't spoil the photographed food.
To begin, you might pair the dimmable LED continuous light with some light modifiers and reflective panels. With time and experience gained in using these two lighting sources, you can consider adding additional equipment to your light set.
Among the most accessible and easy-to-use modifiers are reflective or diffusive umbrellas and softboxes.
Ensuring accurate colors is crucial in culinary photography, so it's advisable to use tools like a Color Checker or an 18% gray card for color calibration. These tools allow you to verify that the captured colors correspond faithfully to the real ones.
In post-production workflow, having a calibrated screen to display the image accurately and make necessary corrections is essential. For example, if you're working in Adobe RGB, it's important that the monitor can reproduce that color space, otherwise, you might be adjusting colors without fully seeing the effect.
Although it may seem like a complex process, it's crucial for achieving realistic colors.
Another extremely useful piece of equipment is the tethering cable, which allows shooting directly by connecting the camera to the computer. This method offers numerous advantages, including:
- Immediate image viewing on the computer monitor;
- Viewing images at maximum resolution;
- Quick identification of any errors for immediate corrections;
- Direct downloading of images to the computer's hard drive;
- Control of focus, composition, and details for perfect shots;
- Faster and easier camera settings management;
- Real-time image sharing with art directors or clients, both on-site and remotely;
- More effective collaboration with assistants, stylists, and clients;
- Evaluation, comparison, and sharing of images while shooting;
- Instant file backup during the shooting session;
- Saving valuable time;
- Potential additional advantages, such as overlays, patterns, or color corrections, depending on the software used.
If you're not familiar with tethering, here's what you need to get started:
- A camera that supports direct image transfer
Most recent camera manufacturers often offer tethering functionality, but it's best to check your camera's manual to confirm if it supports this option and what types of images it can transfer: JPEG, RAW, or both. - A compatible cable to connect the camera to the computer
Various types of USB cables for tethering exist, such as TetherPro, ensuring a stable and fast connection. It's important to choose a cable suitable for your camera model. - Transfer software
There are several tethering software options, from free solutions provided with the camera to more advanced programs. Among the most renowned are Capture One and Lightroom, the latter known for its versatility, although it can sometimes be a bit slow.
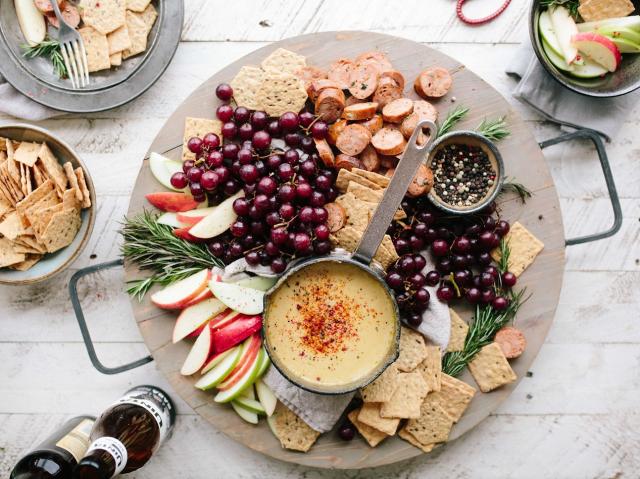
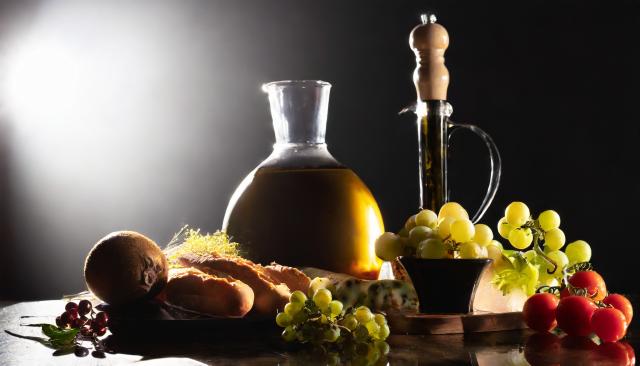
Props
Props are a fundamental element in food photography as they contribute to telling the brand or client's story. Using refined tableware, eye-catching ceramics, suggestive cutting boards, and high-quality fabric napkins can be crucial to setting up the scene and creating extraordinary shots.
Often, these props can be obtained directly from the client, helping to emphasize the essence of their product, especially if personalized with the brand's logo.
Regardless of the origin of the props, it's crucial to agree in advance on which elements to use and how to integrate them into the set, allowing enough time to procure all the material.
Styling and Setting
The food stylist has the same fundamental role in the world of food photography as the fashion stylist has in fashion photography.
Food styling is so intricate that there are professionals specialized exclusively in this field. Usually, food photographers collaborate with food stylists to achieve impeccable and visually appealing compositions.
However, if you're working with a chef, you might not need this additional role. Over time, you'll refine your composition skills and perhaps be able to create an excellent setting on your own.
The appropriate composition of the dish or product is of vital importance and can significantly enhance the quality of your photographs. Always pay attention to this aspect.
The best food photography is the one that makes the dish so appealing that it seems you can taste even the paper it's printed on!
If working with real dishes, it's essential to be quick because food can melt, wilt, or lose its freshness. It's therefore crucial to plan the lighting in advance and practice with an empty plate so that you're ready when the real dish is presented, allowing you to shoot quickly.
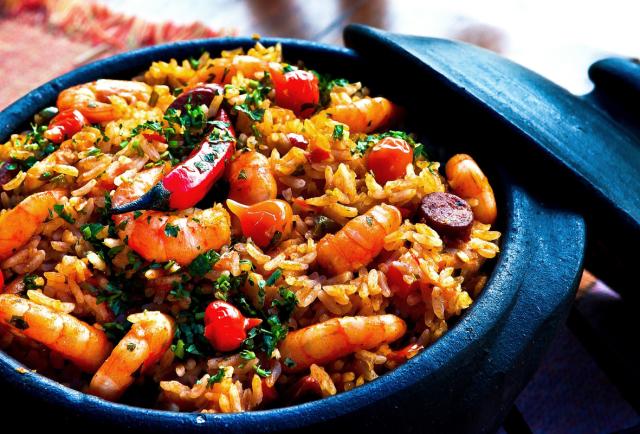
Always pay attention to details: it's these small nuances that make the dish interesting, such as a light trace of sauce, a few crumbs, a scattered olive, or a sprig of herbs.
Observe the dishes of great chefs: they're never dirty or messy. Each element is clean, and small decorations or crumbs are placed carefully and precisely, following the rules of the art.
Style
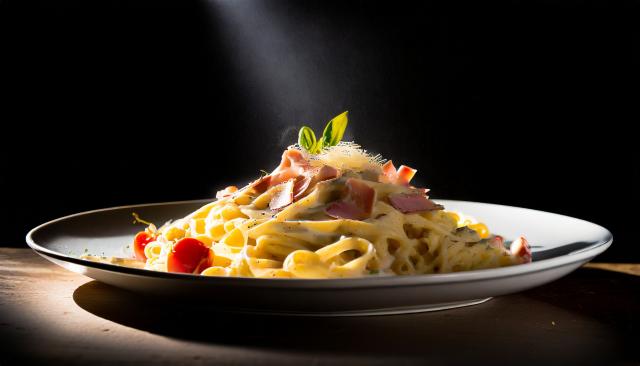
In food portraits, sometimes water droplets or oil brushstrokes are used to highlight the texture. Capturing the steam rising from a hot dish can make it even more appetizing, but it's not always easy to capture.
Therefore, the pre-preparation of the photographic scene is very important to ensure that everything is ready at the right moment for the arrival of the dish.
When pre-preparation is not possible for various reasons, we can suggest an alternative. Although it doesn't work for all types of dishes, it could be a useful resource: you can put moistened cotton balls in the microwave and then hide them behind the plate. Et voilà! Homemade fake steam!
These small tricks can give the dish a more inviting and genuine look.
Today, the trend in food photography is moving away from the fake and perfect images of the past, made with non-edible elements, fortunately. A style is emerging that embraces imperfections for a more authentic, natural, and genuine look.
Regarding composition, it's essential to seek balance, using various compositional rules and playing with elements on the plate to create visual harmony. Guidelines, represented by cutlery or other props, can enhance the visual flow of your photographs, guiding the viewer's eye toward the main subject of the photo.
For example, using cutlery like forks, spoons, or knives can direct the gaze toward the point of interest, making your visual communication more effective.
Order and Disorder
This may seem obvious, but many novice food photographers make mistakes in the composition of their photos. Remember, there's a big difference between organized disorder and simple messiness.
Make sure to clean the edges of the plate and remove small crumbs. Keep your background clean and organized. It's acceptable to have one or two supporting elements, but their placement should be intentional, enhancing the subject rather than being random.
Avoid overcrowding your photographs with too many props. Empty space can give the eyes a break and contribute to creating more harmonious images.
You don't need to overload your plate with excessive decorations like berries or candies; instead, free up space around and let your plate be the star. Empty space can also give you flexibility to add elements like text, slogans, barcodes, or prices, especially useful for commercial food photography.
Shooting Angles
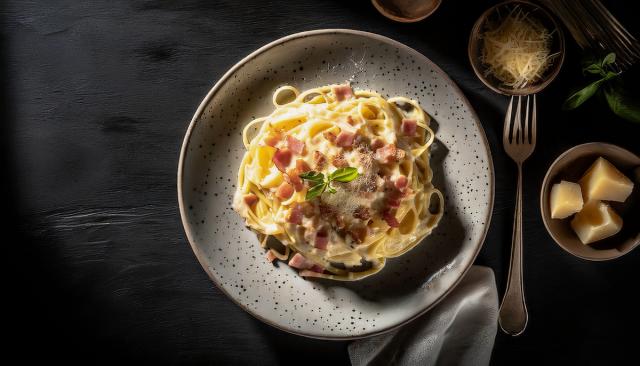
The most popular and often used framing on Instagram at the moment is the top-down shot, which, depending on the composition around the dish, creates a feeling of cleanliness, minimalism, and elegance. It's often preferred for haute cuisine dishes as it conveys a sense of luxury.
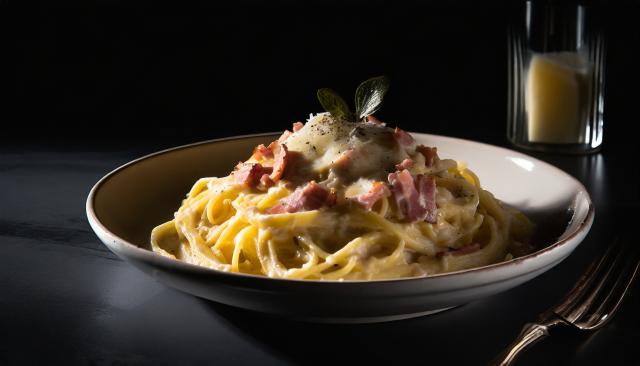
However, the top-down perspective might not always be the best choice, especially if the dish is vertically oriented or has multiple layers. In these cases, you might position the camera at the same height as the food, right beside the plate.
Another option is to tilt the shooting angle by 25 or even 75 degrees upwards. These alternative viewpoints can often enrich the image.
I recommend experimenting with all four shooting angles and then comparing the results.
Which framing best highlights the dish you're photographing?
Always remember, it's important to showcase what you're shooting but without exaggerating in the visual representation! You can present an 8 euro dish as if it's worth 15/20 euros, but avoid going as far as 60 euros or vice versa. Otherwise, you risk deterring potential customers and compromising your client's business.
Over time, you'll develop an instinct that guides you in choosing the most suitable framing, considering visual communication and the message you want to convey with each image.
Make sure to be prepared in advance and ready with the chef before you start shooting; otherwise, you might waste valuable time on adjustments and miss the best moment to photograph the dish, which, as we've mentioned, can deteriorate quickly.
Make the Food the Star
How to always make the food the main focus of your photo?
There are several ways, one of which is by utilizing depth of field. Using a macro lens, you can focus on the food and bring it to the forefront, blurring the background. This automatically puts the dish in the area of greatest interest for the viewer.
Macro lenses are very useful tools in food photography to highlight and emphasize the main product. However, this isn't the only technique in the photography arsenal. To understand how best to highlight the product you're photographing, answer questions like:
- What is the strength of this food I'm photographing? Is it the shape, color, texture, or presentation?
- Does it showcase fresh ingredients with vibrant colors?
- Does it suggest comfort food, luxury products, or healthy and organic dishes?
Once you've answered these questions, draw conclusions that allow you to highlight that particular characteristic. Select suitable props for the story, perhaps opt for a specific type of lighting to emphasize texture, and so on.
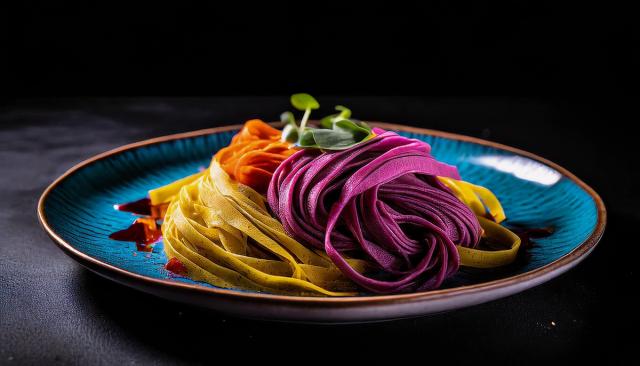
You should also consider the use of color in your images.
Generally, the background and props should be neutral or dark, so as not to distract attention from the main focus of the photo: the food. Think of still life paintings done in oils: artists use dark backgrounds to make vibrant fruits like apples and bananas stand out.
The same concept applies to food photography.
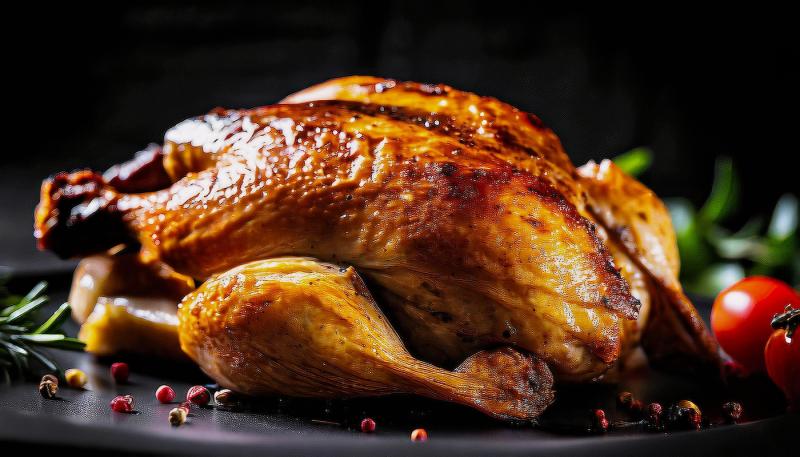
Food that creates a strong contrast, such as a plate of carbonara pasta on a matte black plate, for example, is perfect to photograph against a dark background for impact and emphasis
Lighting
Lighting in food photography is highly subjective and determined by the type of message you want to communicate.
It can be diffused, slightly flattening the composition, or defined and sharp, creating chiaroscuro and three-dimensionality.
To accentuate the oily aspect of a food, I recommend using a reflective panel to create positive fill and a clear reflection on the oily part. This reflection serves a similar function to lighting in the eyes in a portrait, bringing life to the subject.
If you're photographing something shiny, like a glass bottle or a smooth, reflective surface glass, you might notice unwanted reflections. To avoid spending hours in post-production to eliminate them, you can adopt two approaches.
The first is to use masking and reflecting panels on the sides of the product to minimize reflections. Alternatively, for more persistent reflections, you can create a mask from white or black bristol board, depending on the desired effect: white for a bright effect and black for an opposite effect.
Presentation
How to present your food photographs once taken?
This aspect can be as important as your photographic skills. You should consider the future use of your images.
Every professional photographer, whether specializing in food or fashion, needs an outstanding portfolio to promote their work, both in print and digital formats.
Your website should be the primary professional tool to showcase your work and attract new clients. Ensure you create a consistent collection of images with a well-defined style so potential clients know what to expect from your work.
Try to build or have built a website that's easy to update and offers flexibility and user-friendliness.
Conclusions
As with any photographic style, in food photography, there are no hard and fast rules to follow, but it all lies in the photographer's creativity.
With these simple guidelines, you can certainly produce professional food photographs. By studying good composition and a precise lighting scheme, the result will undoubtedly meet your expectations.
When you subscribe to the blog, we will send you an e-mail when there are new updates on the site so you wouldn't miss them.
About the author
By accepting you will be accessing a service provided by a third-party external to https://www.insightadv.it/


Comments