
How to improve seascape photography
Seascape photography represents a genre focused on capturing the beauty and essence of the sea or ocean, along with its surroundings. Photographing these scenarios involves capturing various elements such as the coast, beaches, waves, rocks, cliffs, marine life, lighthouses and other elements associated with the sea. The goal is to create visually stunning images that evoke a sense of tranquility, drama and awe.
Going to the beach during hot summer days is a common desire. Many seek the sea to sunbathe, swim or walk on the beach with their dog. However, the coast also offers the opportunity to capture stunning photographs during all seasons, not just summer.
Seascape photography presents dynamic challenges, requiring awareness and consideration of various factors. However, through careful composition, timing and mastery of techniques, photographers can create stunning images that transport viewers to the enchanting world of the ocean.
In this I will explore critical aspects of seascape photography, such as composition techniques, lighting, long exposures, timing, filters and accessories, equipment, post-processing and more.
Consider your composition carefully but play by the rules.
Composition plays a crucial role in seascape photography, helping to create visually engaging and exciting images. Mastering composition techniques, such as the rule of thirds, leading lines, and frame-in-frame, can significantly improve the impact of your photographs.
Find an attractive focus or topic.
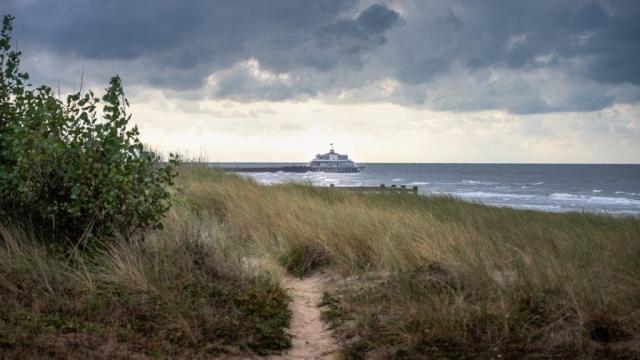
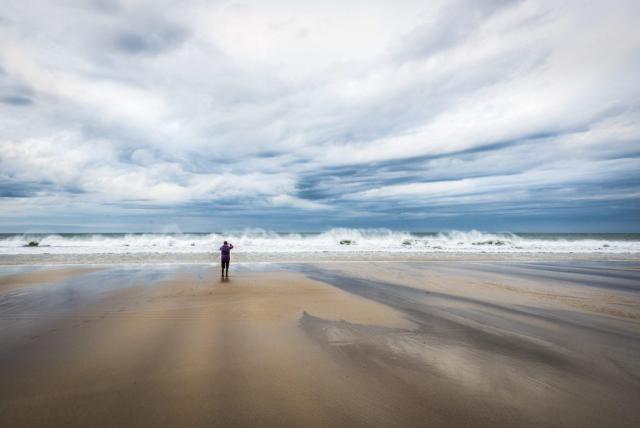
The vastness of a beach offers ample opportunities, but risks becoming monotonous. To avoid this, identify fascinating elements that capture the viewer's attention. In the vastness of the beach, you can find intriguing objects such as footprints in the sand, washed up shells, crashing waves or natural drawings in the sand. Landmarks like a lighthouse can also add visual interest. Also take advantage of the interplay of lines created by receding or rising water to add depth to your composition. Experiments with viewpoints can amplify or attenuate this effect.
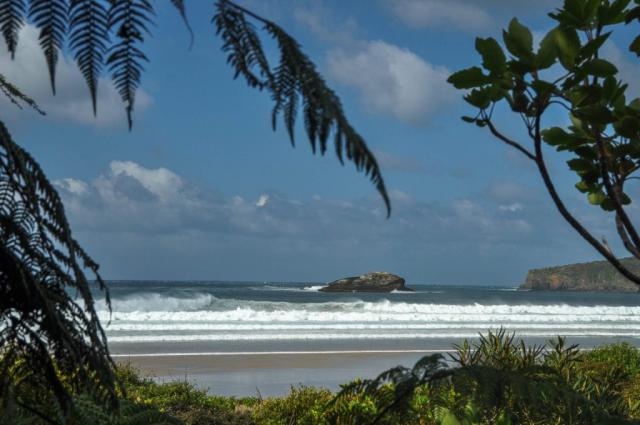
An equally fascinating opportunity is to capture waves as your main subject. Use a longer lens to enlarge them and get sharper details.
There are two main approaches to photographing waves: from the shore or by swimming near them. While the second option requires specialized equipment, the first can be accomplished with a telephoto lens to freeze the action. A shutter speed of 1/800 – 1/1000 (depending on the angle of the waves) is generally effective for freezing motion. Also explore longer exposures, such as 1/10 second, to capture an explosion or burst effect, adding drama and tension to your photo. Experiment is the key to finding out what works best in different conditions.
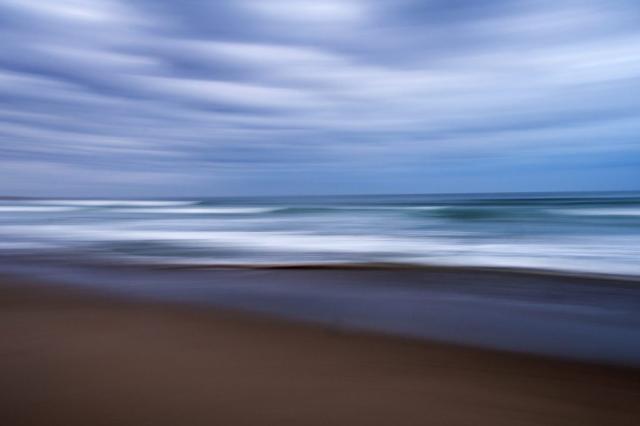
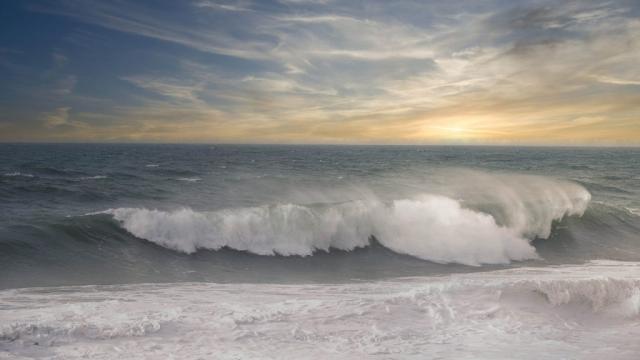 This photo of these waves was taken handheld from the beach in the late afternoon, 1/1000, 130mm, F 10. The waves were pushed back in a spray, thanks to the wind coming from the land.
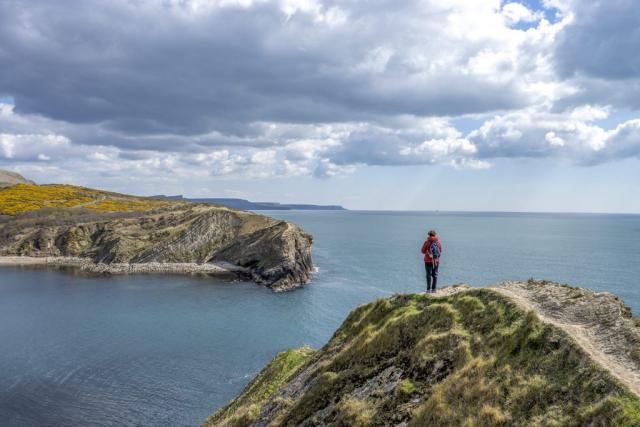
Shoot from a higher vantage point.
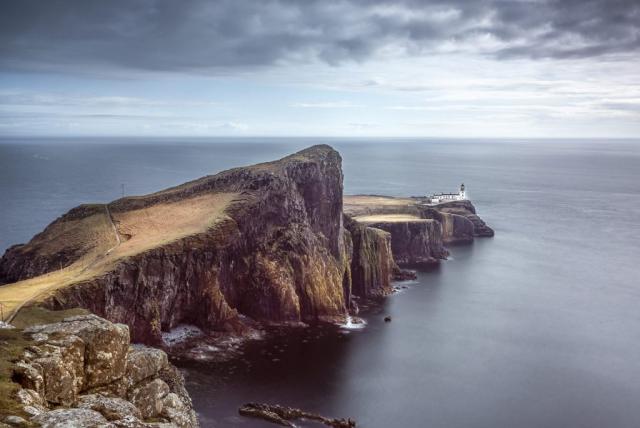
Choosing an elevated viewpoint, such as cliffs, dunes or seawalls, can give you a stunning perspective.
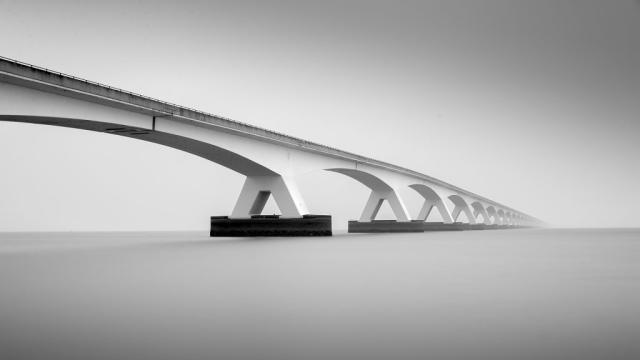
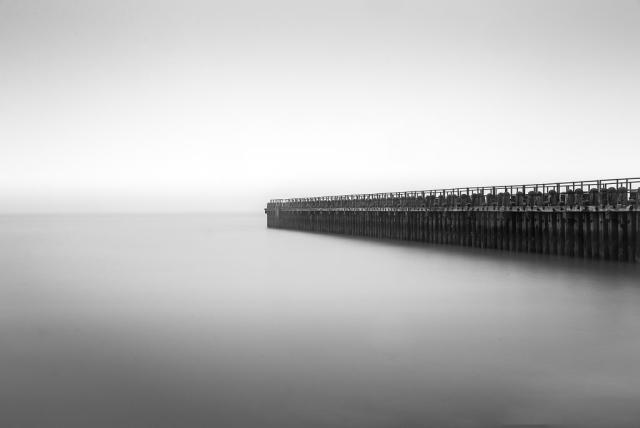
Exposures of more than 30 seconds smooth the surface of the water, creating a uniform effect. This, combined with the bold lines provided by the outlines of the cliffs, gives a surreal, almost ethereal look to the photos. These shots carry with them a sense of eternity.
In bright light, you may want to go down to sea level to avoid the water details from above making the photo complex. However, this dynamic changes when you are faced with massive waves crashing right beneath your position. Furthermore, during daylight hours, a higher position offers more vibrant colors and minimizes distractions from visual patterns.
Photographing the ocean during the day offers one of the best viewing opportunities. Thanks to the greater height, the water surface reflects less light, resulting in richer and more intense colors.

Use the guidelines
The wise use of guidelines represents a compositional technique of great impact in the photography of seascapes. Natural lines, which manifest themselves through the coast, waves and other elements, have the power to direct the viewer's gaze into the frame, generating a sensation of depth and enriching the level of visual interest. Beyond that, the guidelines serve as a tool to define a clear visual path, focusing attention on the main subject or point of focus.
Tips for using guidelines effectively:
- Follow natural shape : Identify and follow natural shapes already present, such as the coastline, the flow of waves, or anything that has a clear direction. Integrate these lines into your composition.
- Create Depth : Lines that extend toward the horizon help create a sense of depth. Use this perspective to immerse viewers in the marine environment.
- Convergence : Look for points where the leading lines converge, as this can emphasize the focal point and add dynamism to the image. For example, where the waves meet or where the coast appears to converge on the horizon.
- Experiment with perspectives : Vary your point of view to alter the direction of the guidelines. This can significantly affect the appearance and perception of the image.
- Maintaining Balance : As you incorporate guidelines, make sure the composition maintains an overall visual balance. A balanced use of lines will help maintain consistency in the image.

Apply the Rule of Thirds
The rule of thirds is a fundamental pillar in photographic composition, dividing the frame into a 3x3 grid. Elevate your compositional approach, creating balanced, visually engaging compositions by positioning key elements along guidelines or at grid intersection points. This technique, in addition to giving dynamism, discourages placing the main subject in the center, helping to make the image more compelling.
Tips for taking full advantage of the rule of thirds:
- Place key elements : Identify the crucial elements of your scene and place them along the horizontal or vertical guidelines of the grid, or even better, at the points of intersection. For example, place the horizon along one of the horizontal lines.
- Guide attention : Use the rule of thirds to direct the viewer's attention to the desired focal point. Strong points such as the main subject or a characteristic element should occupy strategic positions on the grid.
- Experiment with angles : Play with the angle of the guidelines and intersection points. Vary your point of view to achieve different compositions and highlight distinct aspects of your scene.
- Compositional flexibility : While respecting the rule of thirds, maintain some creative flexibility. Sometimes, breaking the rule a little can lead to unique and surprising results.
- Balance the composition : Make sure the distribution of elements on the grid contributes to a harmonious balance. A well-balanced composition offers a pleasant and organized look.
Adopting the rule of thirds can become an effective key to improving your photographic composition, transforming your images into more engaging and dynamic visual works.
Frame and exploit perspective.
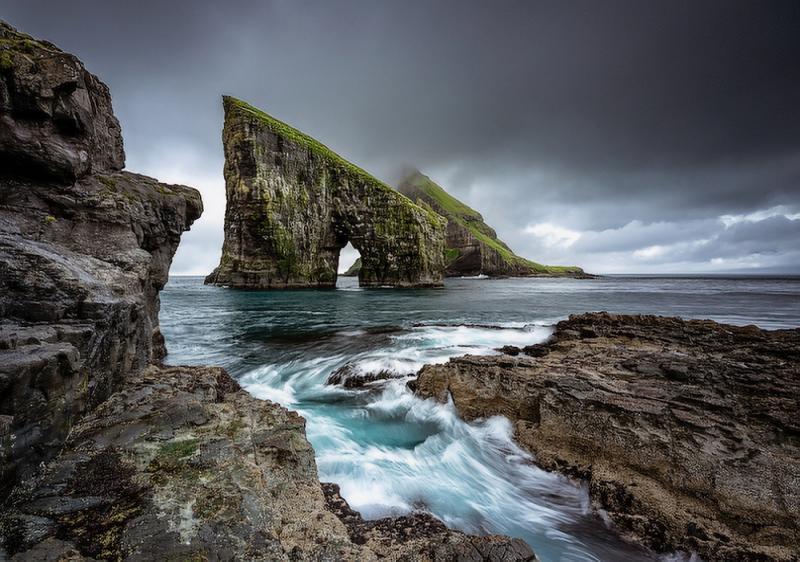
Use natural elements such as frames or points of interest to emphasize your subject. For example, you can use rock formations, arches, or overhanging branches to frame the scene and draw attention to your subject. Also, consider exploring different perspectives, such as shooting from a low angle or including foreground elements, to add depth and create a more immersive experience for the viewer.
Align your horizon perfectly
Regardless of the seascape you are capturing, it is essential to maintain a level horizon. You can use the viewfinder on the camera screen or a spirit level on the tripod to ensure the horizon is flawless. If you find at home that your photo is not level, it means that the composition was not fully perfected in the field. Tools like Crop and Straighten in Lightroom or Photoshop can be used to fix any imperfections.
Take advantage of negative space
Negative space, or empty or unoccupied areas in the image, can be a powerful element in seascape photography. This technique can be used in several ways:
- Emphasize the main subject : Strategically use negative space to make the main subject of the photo stand out. Surrounding your subject with a blank area makes them the focal point of the image, eliminating distracting elements and drawing attention in a significant way.
- Create a sense of serenity : Seascape images often aim to convey calm and tranquility. Incorporating negative space can help create a serene and peaceful atmosphere, allowing viewers to immerse themselves in the vastness of the sea.
- Provide breathing room : Negative space gives viewers' eyes a visual break within the image. This pause allows you to appreciate the overall composition in a relaxed way, preventing the image from appearing crowded or overwhelming.
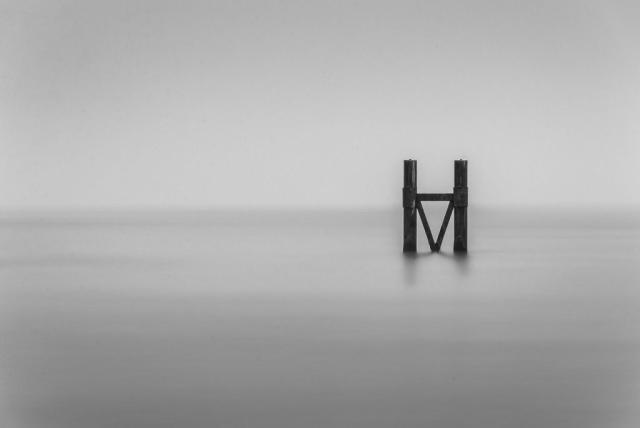
- Enhance minimalism : If you want to adopt a minimalist style, negative space can play a key role. A clean and tidy composition allows you to appreciate the beauty of the sea in an essential and orderly way.
- Invoke imagination and storytelling : Allowing space for viewers' imagination can make the image more engaging. Negative space can stimulate curiosity and encourage viewers to create their own emotional narratives.
- Balancing the Composition : Negative space plays a crucial role in balancing the overall composition. It helps distribute visual weight evenly, creating harmony and a sense of balance within the frame.
Overall, the strategic use of negative space in seascape photography can significantly enhance the visual impact, allowing viewers to connect in a unique and contemplative way with the captured scene.
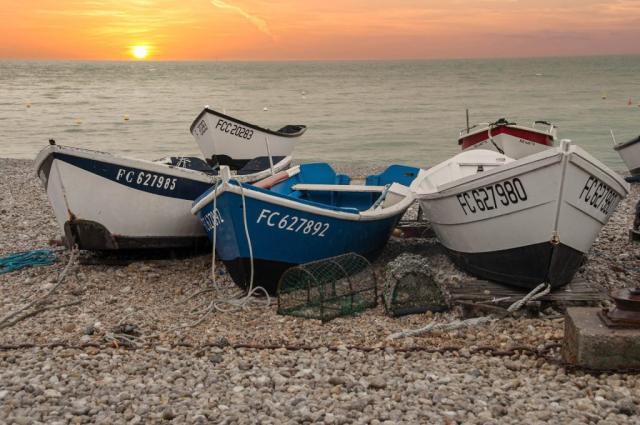
Select an interesting foreground
The vastness of seascape photography offers multiple options for choosing an interesting foreground. In addition to common elements like rocks, plants and cliffs, you can experiment with fascinating water dynamics. Depending on the environment, you might create eye-catching subjects, such as moving waves or unique water features.
Add human elements to your scene
Including people in your seascape photos can bring visual scale, narrative, or human connection to the scene. Here are some creative ways to incorporate human presence:
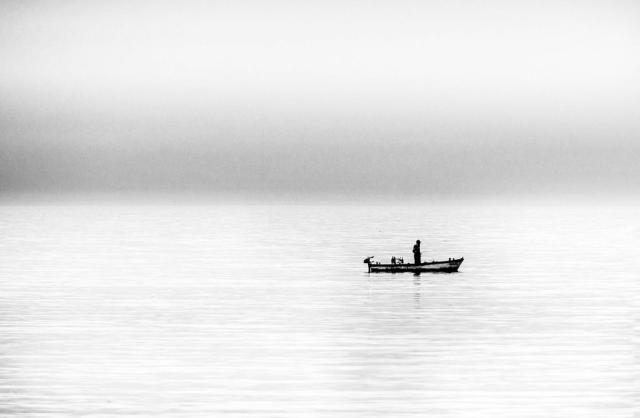
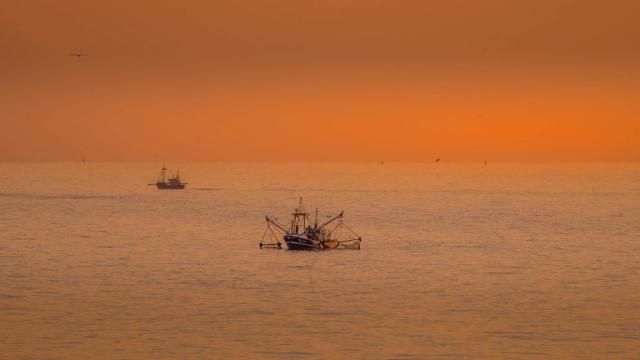
- Mysterious Silhouettes : Capture human silhouettes against the backdrop of the sea, especially during sunrise or sunset, when the light is gentle. Silhouettes can create a strong visual impact, adding a touch of mystery and anonymity to the image.
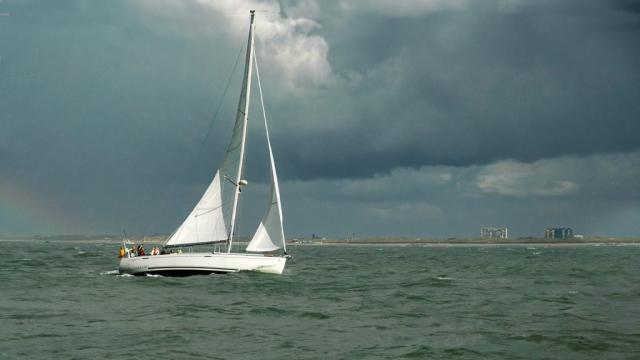
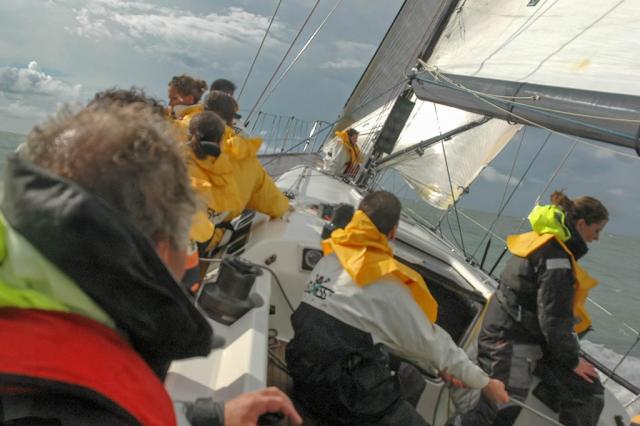
- Action and Movement : Photograph people involved in sea-related activities, such as surfing, swimming, sailing or fishing. Capturing the dynamism of their actions can infuse energy and vitality into the image, making it engaging for viewers.
- Authentic Moments : Look for candid moments where people naturally interact with the sea or their surroundings. It could be someone walking along the shoreline, a group of friends having fun in the waves or simply someone enjoying a quiet moment on the shore. Candid shots convey authenticity, capturing emotions and experiences in a genuine way.
- Portraits in Tune with the Sea : Integrate portrait photography into your seascape shots, with a person as the main subject and the sea as a complementary backdrop. This approach can create a more intimate connection between the viewer and the subject, highlighting emotions and expressions.
When including people in your seascape photographs, it's crucial to consider the composition and their interaction with the scene. Make sure their placement does not distract from the main elements of the landscape, but instead contributes to the narrative or overall visual impact.
Use different shutter speeds
By experimenting with shutter speed you can achieve unique effects like these:
- Moving Streaks of Water : Takes 1/4 to 5 seconds to catch the receding wave. For stronger currents, opt for shorter times, but generally avoid exposures beyond 2 seconds to maintain visual consistency.
- Small Sea Waterfalls : When the wave crashes on a rock, use exposure times of 1 second or longer to create dramatic sea waterfalls.
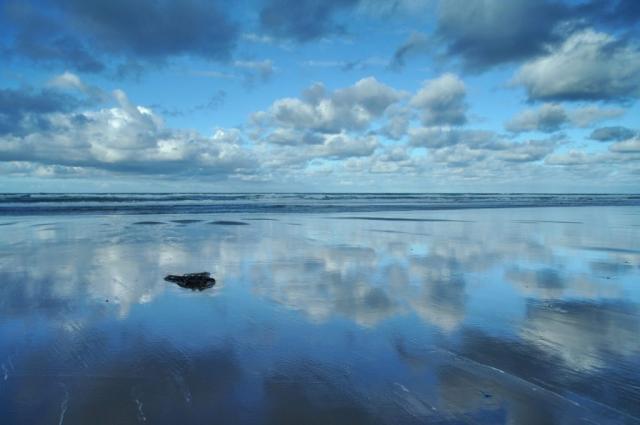
- Reflections in the Sand : With a flat, sandy beach, longer exposure times can capture fantastic reflections. Especially effective during sunrise or sunset.
- Restless Movement of the Sea : For areas where the sea boils and crashes against the rocks, opt for shorter exposure times (1/8 - 1/2) to highlight the power and character of the sea.
- Capturing Waves : For waves, prefer longer exposure times (1/10 - 1/3) to capture them without freezing them completely, maintaining their shape but avoiding a busy look. The solar backlighting offers a particularly evocative effect.
- Color Exploration : The changing color of water can be captured by using shutter speed, creating fascinating color effects.
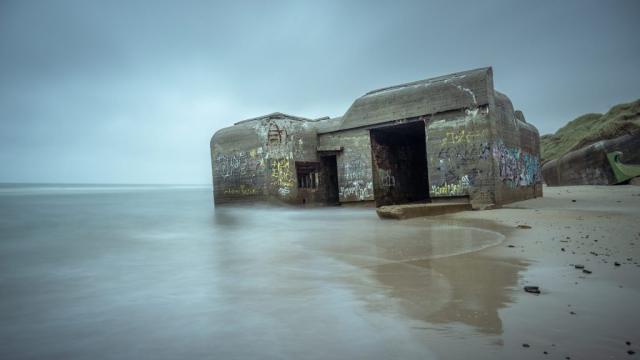
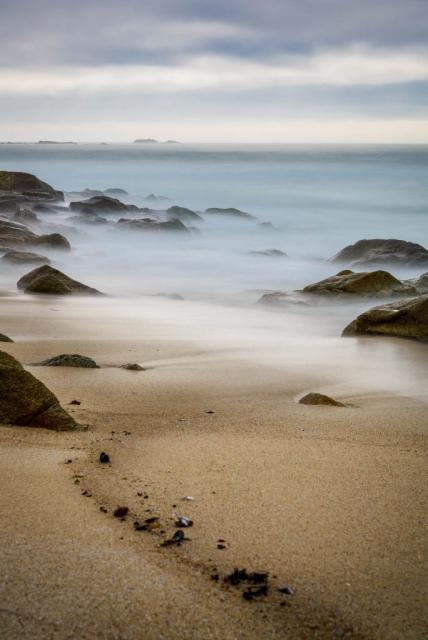
Long exposition
Long exposure photography is a popular technique in seascape photography. Photographers can create a sense of movement in water by using a slow shutter speed, typically several seconds or longer. This technique softens the waves and captures their ethereal, misty appearance, adding a dreamy, surreal quality to the image.
Creating great long-exposure seascape photos requires careful planning and proper equipment and technique. Here are some steps to help you get the best results:
- Choose the right time and climate : Long exposure photography often benefits from soft, diffused light, typically found during golden hour (shortly after sunrise or before sunset) or under overcast conditions. Pay attention to the weather forecast and look for days with clouds or weather that adds interest to the sky. Additionally, consider water movement and tidal schedule to capture the desired effect.
- Use a tripod : A sturdy tripod is essential for long exposure photography. Keeps the camera steady during the long exposure time, preventing any blur caused by camera shake. Choose a tripod that is stable and can withstand wind and uneven terrain. Make sure the tripod legs are fully extended and secured to maintain stability.
- Attach a neutral density (ND) filter : see also tip no. 13. ND filters are crucial for long exposure photography as they block light from entering the lens, allowing you to achieve longer exposure times. Start with a 6 or 10 stop ND filter and adjust it based on your lighting conditions and desired effect. So, attach the filter to the lens before setting up your composition.
- Set a low ISO : Set your camera to the lowest ISO setting to maintain image quality and reduce noise. A low ISO ensures that the image remains clean and retains detail, especially in shadow areas.
- Choose a small aperture : Select a small aperture (high f-number), such as f/11 or larger, to maximize depth of field and ensure sharpness throughout the image. A smaller aperture also helps reduce the amount of light entering the camera, allowing for longer exposure times.
- Use manual focus : Switch the camera to manual focus mode and focus on the most crucial element of the scene. Using live view and magnification can help achieve precise focus. Once you achieve focus, remember to turn off autofocus to avoid accidental changes in focus during the exposure. Sometimes, when using powerful filters, it is not easy to focus with the filter on the lens. On these occasions, focus first without the filter and then place the filter holder on the lens
- Calculate exposure time : With the ND filter attached, your camera's light meter may not provide an accurate exposure reading. You can use a long exposure calculating app or "bulb" mode on your camera to determine the correct exposure time. Start with a longer exposure time (for example, 30 seconds) and adjust it based on the histogram and the desired effect. Then, review the image after the initial exposure to evaluate the exposure and make any necessary adjustments.
- Compose the scene : Consider the elements of your seascape scene and compose your image accordingly. Look for leading lines, exciting foreground elements, or natural patterns that will enhance the overall composition. Consider the flow of the water and how it will appear in the long exposure.
- Capture multiple exposures : It's often helpful to capture multiple exposures of the same scene to ensure you have options to choose from during post-processing. Vary your exposure times slightly and experiment with different compositions to capture the most compelling image.
- Review and adjust: Review your images on the camera's LCD screen to make sure the exposure and composition are as desired. Then, make the necessary changes and resume if necessary.
- Post-processing : Post-processing can improve the final result once you have taken long exposure seascape photos. Adjust white balance, contrast and saturation as needed to get the best out of your image. Pay attention to details like highlights and shadows to achieve the desired atmosphere and balance.
A 10 second exposure provides some basic textures created by the movement of the foam and is less smooth. Shows unusual patterns, different from each photo.
Shorter exposures, starting from 2 seconds and up to half a second, are perfect for seascape photographers. These shutter speeds create the most dramatic and dynamic effects in the water, smoothing it and removing the busy, destroyed look.
Anything faster than 1/15 creates a fragmented look, which you can use to pick up oncoming waves. But to completely freeze the wave, you'll need 1/250 or faster.
Remember that long exposure seascape photography requires patience, experimentation and practice. Take the time to plan your shots, be open to adjusting settings, and embrace the creative possibilities that long exposures offer.
Filters and accessories
Seascape photographers often use filters and accessories to enhance their images. Graduated neutral density filters help balance exposure between bright skies and darker foregrounds, while polarizing filters reduce reflections and improve color saturation. Tripods are essential for stability, especially during long exposures.
In short, filters are valuable tools in seascape photography that can improve the quality and impact of your images. Here are some common types of filters used in seascape photography and their purposes:
- GND (Graduated Neutral Density) filters : GND filters are essential for balancing exposure in scenes with a significant difference in brightness between the sky and the foreground. These filters have a gradient that goes from dark (usually neutral gray) to transparent. By placing the dark part of the filter on the brightest sky and the light part on the darkest foreground, GND filters help reduce dynamic range and preserve detail in both areas, resulting in a well-exposed image.
- Polarizing Filters : Polarizing filters reduce reflections and improve color saturation. They selectively block or allow light waves to align in a specific direction. When photographing seascapes, polarizing filters can reduce glare and reflections from the surface of water, rocks or wet sand, revealing the natural colors and textures beneath. They can also deepen the blues of the sky and water, resulting in more vibrant and saturated images.
- Neutral density (ND) filters : ND filters are designed to reduce the amount of light entering the camera without affecting the color or tone of the scene. They are available in different intensities (measured in stops), from light to extremely dense, and are particularly useful for achieving long exposure effects in seascape photography. You can extend the shutter speed by using an ND filter, achieving soft, ethereal effects on water, such as blurry waves or creating a fog-like appearance.
- UV Filters : UV filters primarily serve as a protective layer for your camera lens, protecting it from scratches, dust, and other potential damage. They also help reduce the effects of UV rays on image quality and can be left on the lens at all times. Although UV filters have minimal impact on seascapes, they are commonly used in various photography genres, including seascapes, for their protective properties.
When using filters, it is essential to choose high-quality options that maintain the optical integrity of the lens and minimize any potential image degradation. Additionally, filters can add additional layers of glass in front of the lens, so proper cleaning and maintenance is required to avoid smudges, fingerprints, or dust that could affect image quality.
Filters give photographers more control over exposure, color and light in seascape photography. Photographers can use appropriate filters for specific situations to capture beautiful seascapes with balanced exposures, reduced reflections, enhanced colors and creative long exposure effects.

Incorporate reflections into your seascape photos
The presence of reflections offers new creative possibilities in seascape photography, although identifying them can be a challenge. Here are some practical tips on where to look for reflective surfaces along the coast:
- Rock Pool at Low Tide : Pools of water created at low tide provide an ideal opportunity for clear sky reflections, especially when waves are less frequent.
- Puddles on rocks and rock platforms : After a rain or storm, explore rocks and rock platforms to capture reflections in remaining pools of water.
- Sandy Beach : During low tide, the wet sand can reflect the sky and create a picturesque atmosphere. Take advantage of the moments when the water slowly retreats to build your composition.
- Wet rocks at dawn or dusk : Wet rocks can produce vibrant orange highlights during the first or last light of the day. Experiment with angles to get more intense lighting effects.
When exploring reflection photography, you can play with symmetry, occasionally breaking the rule of thirds and placing the object in the center to emphasize balance.
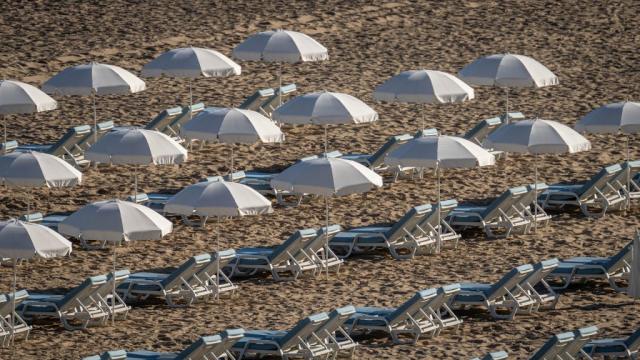
Emphasize patterns and textures
Seascape photography often offers unique opportunities to capture patterns, textures and details in the waves, sand or rock formations. Composition becomes a powerful tool for highlighting these elements and creating visually appealing images. Here are some tips for maximizing the effect of patterns and textures:
- Get closer or use a telephoto lens : To capture intricate details, get closer to the subject or use a telephoto lens. This will allow you to isolate and magnify interesting patterns, making them the focal point of your image.
- Explore perspective : Experiment with different perspectives, such as shooting from the ground or from a high angle. This can dramatically change the look of your patterns, giving you a variety of creative options.
- Play with depth of field : Use a wider aperture to achieve a narrower depth of field, emphasizing your main subject while softly blurring the background. This technique can be effective when you want to highlight a specific pattern.
- Side or grazing lighting : Side or grazing lighting can highlight textures and textures, creating shadows that reveal interesting details. Look for the ideal lighting to accentuate the contours and make the pattern more noticeable.
Maximize depth of field
When dealing with seascape photography, depth of field is a fundamental parameter to consider. An adequate depth of field should cover the entire image area. Here's how to optimize this technical aspect:
- Aperture Settings : Select an appropriate aperture value (f-number) to maximize depth of field. Typically, f/8 or f/11 is a good starting point, ensuring that most of the scene is in focus.
- Focal Length : Focal length affects depth of field. Wide-angle lenses tend to offer a greater depth of field than telephoto lenses. Use this feature to your advantage based on the needs of your composition.
- Focus on a third of the frame : Rather than calculating the hyperfocal range, which can be excessive, focus on about a third of the frame. This is usually enough to achieve uniform sharpness throughout the image.
- Experiment and adapt : Experiment with different settings and adapt the depth of field to your creative needs. You can test the effect of wider or narrower openings based on the key elements of your composition.
Remember that depth of field is one of the keys to ensuring that all elements of the seascape are sharp and well defined, allowing the viewer to explore the scene in great detail.
Lighting
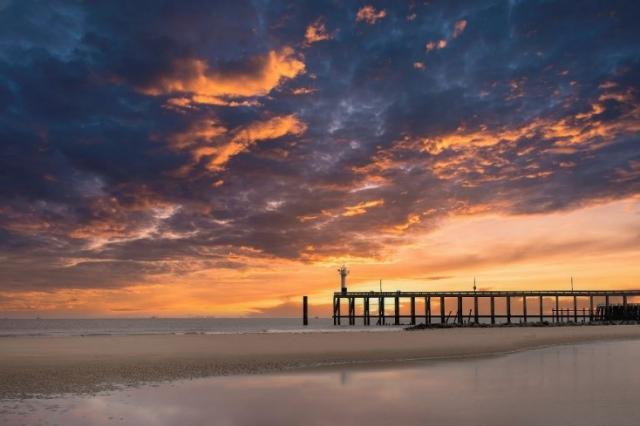
Lighting plays a crucial role in any form of photography, and in seascape photography, it greatly affects the mood and atmosphere of the image. Photographers often aim to capture the soft, warm light of golden hour, shortly after sunrise or before sunset, for particularly dramatic results. However, severe weather conditions, such as thunderstorms, can also offer dramatic lighting that adds depth and dimension to the scene.
Here are some tips for making the most of lighting in seascape photography:
- Golden Hour : Golden hour, shortly after sunrise or before sunset, provides a soft, warm light that creates eye-catching hues. Use this golden light to emphasize details, create striking shadows and give the image a warm, enveloping look.
- Side or raking light : When the sun is low on the horizon, side or raking light can highlight texture and detail, creating long shadows and defining edges. Capture the scene so you can make the most of this enveloping light.
- Adverse Weather Conditions : Don't be afraid to face adverse weather conditions. A cloudy sky can diffuse light evenly, eliminating harsh shadows and creating an ethereal atmosphere. During thunderstorms, you can capture dramatic, lightning-lit scenes.
- Explore different lights : Experiment with different lighting conditions and see how they affect the look of your image. Each type of light can add a unique element and contribute to the overall mood of the photo.
- Respect the nature of light : Respect the direction and intensity of natural light when planning and capturing your images. Knowing how light interacts with the seascape will help you create more effective and evocative compositions.
Use guidelines effectively
Shrewd application of guidelines in seascape photography can lend depth, direct the viewer's eye, and instill a sense of dynamism in the image. Here's how you can maximize the use of guidelines in your seascape compositions:
- Identify Natural Guidelines : Examine natural features in the seascape that can serve as guidelines, such as the coastal profile, waves, rock formations, jetties, or details in the sand. Spend time exploring the location to identify elements that organically lead the eye towards the main subject or point of interest.
- Strategically Place Leading Lines : Once identified, carefully place leading lines within the frame to create a path or visual flow. Follow the rule of thirds by placing lines outside the center to add balance and visual interest to the composition. Experiment with various angles and points of view to find the most convincing arrangement of the main lines.
- Use Diagonal or Curved Lines : Diagonal lines add dynamism and energy to seascape compositions, while curved lines convey grace and elegance. Look for opportunities to incorporate these shapes into your compositions, whether they are moving waves, sinuous coastlines, or arches of rock formations.
- Leading Lines as Foreground Elements : Leading lines can also serve as foreground elements, capturing the viewer's attention and guiding it towards the horizon. For example, a receding wave can create a line that starts in the foreground and heads towards the horizon, adding depth and dimension to the image.
- Experiment with Different Compositions : Dare to explore different compositions and perspectives to make the most of the main lines. Try shooting from different heights, such as crouching or standing, and see how the guidelines change and affect the overall composition. Keep an open mind to creative possibilities and explore various perspectives to capture unique and engaging images.
- Balance Leading Lines with Other Elements : While keylines are crucial, they must coexist harmoniously with other elements in the seascape. Consider the placement of the main subject or focal point in relation to the guidelines, not allowing the subject to be smothered or obscured by the lines, but rather complementing and enhancing the composition as a whole.
- Post-Production Refinements : After capturing seascape images, you can further enhance key lines during post-processing. Adjustments to contrast, saturation, and sharpness can emphasize lines, making them more noticeable within the image. However, it is essential to avoid excessive processing that can make the lines unnatural; aims for a natural and balanced enhancement that complements the overall aesthetic of the photography.
Remember, leading lines are powerful compositional elements, but they must serve a specific purpose in your image, such as directing the eye toward the main subject or creating a visual journey within the frame.
Choice of moment and observation of atmospheric conditions
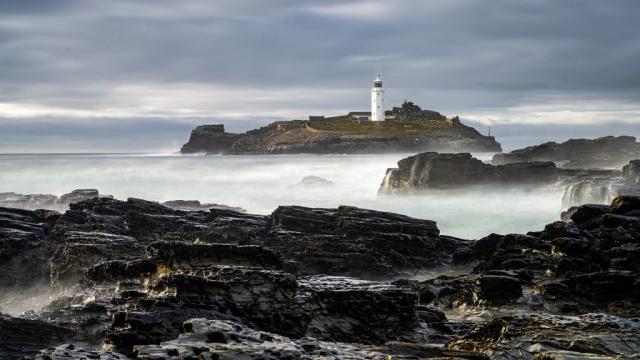
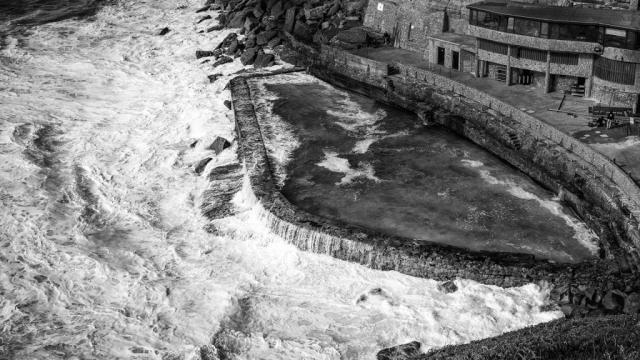
Temporal precision is essential in seascape photography. Photographers are used to waiting for the perfect moment when tide, waves and weather conditions converge to create the desired effect. For example, high tides combined with stormy weather can generate powerful waves crashing against rocks, while low tides can reveal intricate patterns and formations on the beach.
The standard approach is to take shots at sunrise and sunset, a good practice, although with some exceptions. The sea takes on vibrant colors when the sun is high in the sky, especially when photographing from elevations such as cliffs or dunes. Depending on the depth of the water and the bottom, a deep blue or a vibrant cyan may emerge.
Another option during the day is to focus on beach photography. The hard, intense, uniform light eliminates unwanted shadows, bringing uniformity to color and lighting. This style of photo is typical of paradise beaches and is worth exploring.
Before attempting your beach shoot, it is prudent to carefully check the weather forecast, considering sun, tides and cloud cover. Photographing during a sea storm requires the use of strong winds, offering stunning images, especially when combined with wind-blown sand. The arrival of a storm can generate threatening steel-blue skies over the sea. Additionally, local cloud cover, lit from below by the setting sun, often results in spectacular skies. Seascape photography thus becomes a continuous intrigue of elements such as water, light, sand and dynamism.
On our west coast, the sun does not rise directly over the sea but behind the eastern dune line. This implies that the tide line is in shadow at first light. However, the early light can illuminate the clouds beautifully, so it is advisable to arrive early in the morning if you want beautifully colored skies.
At sunset, it can be fascinating to extend your stay time. Contrasts decrease, color tones become softer and longer exposure times contribute to greater color saturation, creating an atmospheric atmosphere.
Know the tides
A crucial element, closely linked to the times, is the understanding of the tides. Therefore, don't start your photography session without being familiar with current and future tides. This is critical for two reasons: ensuring your safety and taking full advantage of creative opportunities.
Many photographers are willing to push their limits to capture a stunning image, and this can involve some risk. This is not dictated by the search for adrenaline, but by awareness of the potential for an exceptional image. However, this approach is guided by knowledge of consequences and dangers. Knowing the movement of the tides, whether they are rising or falling, allows you to move along the coast safely while filming.
Photographing seascapes without an accurate understanding of tides is similar to climbing a mountain without preparation. The risk of encountering difficulties is considerable. In some regions, the tides can rise quickly and surprise you while you are immersed in the action. Always pay attention to changing tides during your shoot, as they can vary depending on location, lunar cycles and weather conditions.
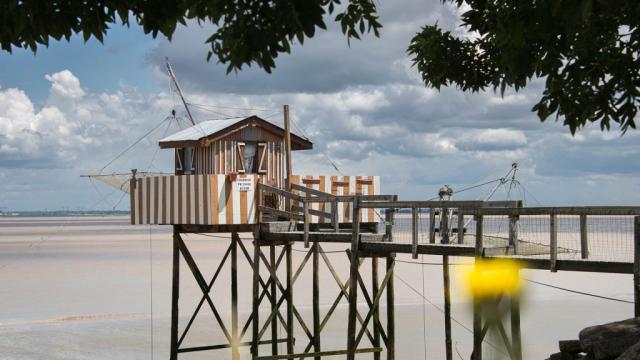
The beach, shaped daily by the action of sea water, features a tide indicator when the water reaches its maximum during high tide. This sign is evident with debris, weeds and shells. A short beach, full of footprints and remains on the tide line. Personally, I prefer low tide or ebb tide, as during high tide these features are submerged.
The tidal zone, between the tide line and the low tide line, is a particular feature that I often integrate into my compositions. This area becomes dry land twice a day and is submerged as many times. The action of the water in this area creates photogenic structures and small pools that reflect the sky beautifully. In general, I don't find photographing at high tide particularly fascinating.
The second reason why understanding tides is essential is creative in nature. Planning is a crucial element in photography.
If you find a beach fascinating, it is during low tide that it reveals its magic. During this time, hidden textures and patterns in the sand emerge, making the beach incredibly evocative. Planning carefully and waiting for the right time to photograph your beach early in the morning, at low tide, is essential. It would be a shame to arrive and find that it is high tide.
Tides can greatly affect the composition and visual impact of your seascape images. Here because:
- Access to Various Features : The tide level determines which features and elements will be visible or submerged. Rocks, tide pools, or coastal formations may be covered by water at high tide, limiting compositional options. At low tide, however, more shoreline details, such as exposed rocks or patterns in the sand, can be revealed, providing opportunities for unique compositions.
- Movement and Flow : Tides affect the movement and flow of water, significantly impacting the dynamic elements in your seascape photographs. Photographing during incoming or outgoing tides can create interesting patterns and textures in the water as it interacts with the shoreline. Waves crashing against rocks or receding water can add drama and energy to your images.
To effectively plan your seascape photography around the tides, consider the following:
- Research Tide Charts : Check local tide charts or consult reliable sources to determine high and low tide times before heading out. Many online resources and smartphone apps provide precise tide information based on your location. I use "My Tides" and "Tide Planner".
- Explore Locations in Advance : Visit your chosen location in advance, ideally during both high and low tide, to understand how the tides affect the landscape. Take note of interesting features that may be hidden or revealed at different tide levels. This will help you plan your compositions accordingly.
- Timing : Decide whether to capture the scene at a high, low or intermediate level to achieve the desired look. Consider how the movement of the water and the position of the sun interact with the landscape to create visually appealing images.
- Composition : Use knowledge of the tides to inform your compositions. For example, you may want to focus on exposed foreground features, such as rocks or tide pools at low tide. At high tide, you can emphasize the power of the waves crashing against the cliffs or capture reflections in the receding water.
Monitor weather conditions
Use reliable apps to check the weather, preferably more than one. One of the most exciting challenges of seascape photography is its unpredictability, especially in regions where you can experience four seasons in a single day. Equip yourself with as much knowledge as possible about the conditions, including temperature, wind, gusts, rain, sunrise and sunset.
Climate variations, especially in the winter months, can take you by surprise. Make sure you wear appropriate footwear and a waterproof jacket. Braving rain, fog, mist and snow will allow you to overcome challenges and adapt to the seascape. Storms, in particular, offer dramatic skies and the chance to catch rainbows.
The importance of a sturdy tripod in seascape photography
While a tripod isn't essential for seascape photography, it can be an indispensable tool with several benefits, especially when getting close to the action. Investing in a solid tripod is essential after dedicating time and resources to purchasing a high-quality camera.
Here are some reasons why using a tripod can greatly improve your seascape photography experience:
- Stability : Tripods offer a stable base, which is crucial when shooting in low light or long exposures. A sturdy tripod ensures sharp images even at slower shutter speeds, allowing you to focus on your composition without worrying about unwanted camera shake.
- Long Exposures : Long exposure photography is a technique widely used in seascapes to create flowing effects on water or capture the movement of clouds.
- Accurate composition : Accuracy in composition is essential in seascape photography. A tripod allows you to frame carefully, make small corrections and keep the camera level, especially useful when aligning horizontal lines or integrating guidelines into your composition.
- Focus Stacking : In some situations, such as when you want sharp focus for both foreground elements and distant landscape, focus stacking may be necessary. This technique involves blending shots captured at different focal points. Using a tripod ensures that the camera remains stable for each shot, simplifying the blending process in post-processing.
- Patience and Waiting : Seascape photography often requires patience to capture the perfect moment, such as the ideal wave or optimal light. Mounting your camera on a tripod allows you to maintain the desired position, freeing your hands during long waits and reducing the risk of missing a shot.
However, there are circumstances where using a tripod may be impractical, such as when you are looking for maximum mobility or want to capture candid moments. The decision to use a tripod or not will depend on your photography style, working conditions, and specific vision for your seascape images.
If you opt for a tripod, choose a model that is sturdy, lightweight and adjustable in height and angle. This will ensure reliability and convenience during your photographic adventures. Many brands offer good quality tripods, offering a variety of designs to choose from. Personally, I use a carbon and waterproof Sirui tripod for its sturdiness. In situations where lightness is a priority, I opt for a more compact and lightweight travel tripod, easily transportable in my suitcase or backpack.
Here are some extra tips for using a tripod:
- If it gets hit by a salt wave, rinse it with fresh water or put it in the shower when you return.
- Stick it lightly into the sand while shooting on the beach to increase its stability.
- If you find yourself in moving water, continue to hold it to avoid dangerous situations.
- Apply a little oil to lubricate any stiff joints.
- Use the backpack as a counterweight by attaching it to the tripod, making it more stable. Make sure, however, that the wind does not make both the backpack and the tripod sway.
Choosing the ideal camera for seascapes
Choosing the "best" camera for seascape photography is closely tied to your personal needs, preferences, and budget. However, there are several crucial factors to consider when selecting a camera for this specific discipline. Here are some things to keep in mind:
- Image quality: Opt for a camera that has a high-resolution sensor and excellent low-light performance. Larger sensors, such as full-frame or APS-C, tend to offer superior image quality, capturing sharper details and a wider dynamic range.
- Weather Resistance: Since seascape photography often involves harsh environments with salt water spray, wind and sand, it is advisable to opt for a weather resistant camera. This will ensure your device is protected from the elements, preserving its reliability and longevity.
- Dynamic range: Since seascapes often feature high contrast between sky and foreground, a camera with excellent dynamic range capabilities will be able to capture a wide range of tones, preserving detail in both bright and dark areas.
- Autofocus: Choose a camera with a reliable autofocus system, especially if you plan to capture fast-moving waves or marine animals. Advanced focusing systems that offer fast and precise tracking will be especially useful in these situations.
- Various lens options: Make sure your camera system offers a wide range of compatible lenses. Different perspectives and compositions may require different lenses, such as wide-angle lenses for panoramic views or telephoto lenses to capture closer details.
- Handling and ergonomics: Since you will be spending a lot of time photographing seascapes, the comfort of the camera is crucial. Intuitive controls and a comfortable grip make using the camera more enjoyable and efficient.
- Budget: Set a budget based on your priorities. Remember that high-quality lenses are just as important as the camera body for great images.
Popular cameras for seascapes include full-frame DSLRs like the Canon EOS 5D or Nikon D850, mirrorless cameras like the Nikon Z7 II, Sony Alpha series or Fujifilm X-T4, and advanced APS-C cameras like the Nikon Z50. These are just examples, and many other cameras can perfectly suit the needs of seascape photography.
Ultimately, the "best" camera is the one that suits your style, allowing you to capture the magnificent coastal scenes that align with your artistic vision.
Choosing a Lens for Seascapes
Lens selection is crucial to achieving stunning results in seascape photography. Here are some key aspects to consider:
- Wide Angle Lens : Indispensable for capturing broad views and embracing a large portion of the scene. Look for lenses with focal lengths between 16mm and 35mm on full-frame cameras, or their equivalent for crop-sensor cameras. These lenses accentuate landscapes, highlighting the foreground and creating a sense of depth.
- Aperture : Opt for a wide-angle lens with a large maximum aperture, such as f/2.8 or faster. A larger aperture allows more light to enter, useful in low light conditions and for achieving a shallow depth of field for selective focus effects.
- Image Quality : Choose lenses known for their excellent optical quality, sharpness and low distortion. Trusted brands often offer optimal performance for flawless images.
- Focal Length Versatility : Consider a zoom lens with a range of focal lengths, such as 24-70mm or 24-105mm on full frame cameras. This versatility allows you to adjust composition without changing lenses.
- Filter Compatibility : Since the use of filters is common in landscape photography, make sure your lens has filter threads or a compatible system. A non-rotating front element simplifies the use of graduated ND filters.
- Weight and Portability : Consider weight and portability, especially if you need to hike or travel. Lightweight lenses make it easy to transport and reduce fatigue while on the move.
Additional Considerations:
- Creativity and Perspective: In addition to the wide-angle lens, explore using longer lenses to narrow your perspective and focus on distant details. A versatile zoom lens, such as a 24-105mm, can be an excellent choice because of its flexibility.
- Personal Preferences: Lens selection may vary based on your preferences and shooting style. Some photographers also prefer using telephoto lenses to isolate specific elements or create perspective compression effects.
Ultimately, the ideal lens depends on your needs, your photography system, and your artistic vision. Investing in high-quality lenses can make a difference in the overall performance of your seascape images.
Shoot in RAW
The decision to shoot in RAW format is crucial to maximizing the quality of your seascape images. Here because:
- Maximizing Details : The RAW format preserves all the details captured in the image, giving you more control in post-production. This is especially useful for adjusting exposure, sharpness and saturation without significant loss of information.
- Complete Control in Post-Production : Unlike JPEG, RAW gives you full control over the image development process. You can adjust white balance, exposure correction and other parameters without compromising quality.
- Less Compression and Loss of Information : Images in JPEG format undergo compression which can lead to the loss of detail and image quality. RAW, on the other hand, retains the maximum amount of data, preserving the original quality.
- Advanced Editing Possibilities : RAW gives you a wider range of editing possibilities without degrading image quality. You can experiment with color correction, accentuation and applying effects without compromising the final result.
Although RAW files take up more space than JPEG files, the benefits of flexibility and control during the post-production process make this a largely preferable choice for seascape photographers looking for optimal results.
Post-production: Maximize the impact of your images
Post-processing is a crucial step in creating stunning seascape photographs. Using software like Adobe Lightroom or Photoshop, you can optimize exposure, color balance, contrast and sharpness, then making adjustments to emphasize the desired mood and enhance the visual impact, all while maintaining a natural look.
This is why post-processing is key in seascape photography:
- Exposure and Dynamic Range : Marine scenes often feature a wide dynamic range, with bright skies and darker foregrounds. Post-processing allows you to adjust exposure and tonal range to balance highlights and shadows, ensuring a balanced representation of the scene. This allows you to recover details in the shadows and highlights, creating a visually appealing image with a faithful tonal range.
- Color Enhancement : Post-processing offers the ability to enhance and adjust colors in seascape photographs. By optimizing white balance and adjusting black and white points, you can achieve an accurate representation or creatively manipulate colors to evoke specific emotions. For example, saturation and vibrancy adjustments can deepen the blue of the water or enhance warm tones during sunrise or sunset, creating a more captivating and visually pleasing image.
- Contrast and Clarity : Post-processing can improve the contrast and clarity of images, making the scene more dynamic and adding depth. Increasing contrast makes the image more vibrant, while clarity improves details and textures, especially in elements like water and rocks. These adjustments highlight the nuances of the scene, creating a more dramatic image.
- Removal and Cleaning : Seascape images may contain unwanted distractions, such as beach debris or sensor smudges. Post-processing tools allow you to remove these imperfections, ensuring a clean, refined final image. This presents the scene at its best, free of unwanted elements that could detract from the overall impact.
- Cropping and Composition Refinement : Post-processing allows you to refine the composition of seascape photographs. With small tweaks, you can improve overall balance, remove distractions, and experiment with different proportions. You can also straighten horizons, correct perspective distortions and refine the overall composition for optimal visual impact.
- Sharpness and Noise Reduction : Post-processing tools offer options to improve sharpness and reduce noise in seascape photographs. Sharpening makes details such as water and rocks appear sharper, while noise reduction helps maintain clean quality, especially in long exposure situations or at high ISO settings.
- Creative Expression : Post-processing allows for creative and personal expression. You can apply artistic filters, add vignettes, or experiment with tones and effects to convey a specific mood. By taking advantage of post-processing that aligns with your artistic vision, you can make your seascape images unique and true to your creativity.
It is essential to note that while post-processing can greatly improve seascape photographs, it is crucial to maintain a balance and preserve a natural, realistic look. The goal is to amplify the intrinsic beauty of the scene, creating a visually captivating image that faithfully reflects the emotions and sensations experienced at the moment of shooting.
Note: Luminar is a valuable alternative to Lightroom or Photoshop, especially good if an Adobe subscription is out of your budget. Easy to use, Luminar offers advanced tools, such as artificial intelligence for sensor dot removal, simplifying tasks that would require several steps in Photoshop or Lightroom.
Using Photoshop in post-production
Although not essential, Adobe Photoshop can be a valuable tool for advanced editing and retouching of seascape photographs. While dedicated software like Lightroom handles most of the necessary editing, Photoshop offers additional features to enhance your creativity. Here's why you might consider using Photoshop:
- Advanced Retouching : Photoshop provides powerful tools for detailed retouching, allowing you to precisely remove unwanted objects or distractions from seascape images. Advanced selection tools, like content-aware healing and cloning, let you remove or replace elements in your scene effortlessly.
- Exposure Mixing : Marine scenes often have a wide dynamic range. Photoshop offers blending options, such as HDR or luminosity masks, to create a well-balanced image by combining different exposures. This ensures that your photography maintains a natural look.
- Panorama Merge : If you're creating a seascape, Photoshop's Photomerge feature merges images seamlessly, ensuring a smooth transition and precise alignment. This allows you to capture panoramic vastness while maintaining high-resolution details.
- Creative Editing : Photoshop offers a wide range of creative tools, filters, and adjustment layers that can add unique effects and artistic enhancements to your images. You can experiment with textures, create composite images, add dramatic skies, or use various blending techniques to achieve specific results.
- Optimized Adjustments : Photoshop allows more precise control over specific elements of the image through the use of layers and masks. This allows you to selectively adjust colors, tones and details in different parts of the seascape, giving you greater control over the final result.
While Lightroom and other dedicated software can meet most post-processing needs, Photoshop adds complexity and advanced options to your creative workflow. Your choice of software depends on your specific requirements, editing preferences, and the level of complexity you want in processing your images.
Take advantage of luminar neo in the post-production of seascapes
Luminar Neo stands as one of the most advanced software, leveraging artificial intelligence for effective post-production. This ever-evolving tool, enriched with each update, offers increasingly sophisticated features, including HDR Merge, Focus Stacking and Upscale AI. It can be used both as a standalone application and as a plugin for Lightroom or Photoshop.
Follow these steps to make the most of Luminar Neo in post-processing your seascape photographs:
- Import your photos : Launch Luminar Neo and import your seascape photos into the software. You can do this by clicking on the "+" symbol or using the "Import" option. If you prefer to start in Lightroom, where you installed Luminar as a plugin, you can then move directly to Luminar Neo.
- Adjust basic settings : Once your photos are imported, make basic adjustments to improve the overall look. Luminar Neo offers various tools such as exposure, contrast, highlights, shadows, saturation and white balance. Use these tools to adjust basic settings to your preferences.
- Enhance colors and tones : Seascape photography often benefits from vibrant, well-balanced tones. Take advantage of Luminar Neo's advanced tools, such as the AI Accent Filter, AI Sky Enhancer, AI Structure, and AI Enhance, to automatically enhance colors and details in your photos. Experiment to maximize the visual impact of your images.
- Perfect your composition : Composition is crucial in seascapes. Use Luminar Neo's crop and rotation tools to optimize the composition of your images. You can also experiment with the AI Composition tool, which provides suggestions to improve the overall composition based on the subject and elements of the photo.
- Remove Distractions : Sometimes, unwanted elements can detract from the beauty of a seascape. Luminar Neo offers powerful tools like Erase and Clone and Stamp to remove distractions such as people, boats or other objects in your photos. Use these tools carefully for natural results.
- Apply creative filters : Luminar Neo offers a wide range of creative filters and effects to give a unique touch to your seascape images. Experiment with filters like Orton Effect, Sun Rays, Golden Hour, Dramatic and others to enhance the mood of your photos.
- Enhance the sky or replace it : Use Luminar Neo's tools to enhance the existing sky or replace it completely, ensuring a harmonious balance with the scene. This feature can dramatically transform the overall look of your image.
- Refine with local adjustments : To further refine specific areas of your seascape photos, take advantage of Luminar Neo's local adjustment tools. These tools allow you to selectively adjust particular parts of the image, such as the sky, water or foreground, by adjusting parameters such as exposure, contrast, saturation and sharpness.
- Save and Export : When you're happy with your changes, save your work in Luminar Neo's project file format to preserve all your adjustments. If you want to share or use your photos outside of Luminar Neo, export them to a suitable format, such as JPEG or TIFF.
Remember that these steps are a starting point, and the exact changes will depend on your preferences and the specific characteristics of your seascape photos. Explore Luminar Neo's features, experiment with different settings, and let your creativity guide the creation of stunning seascape images.
Convey tranquility in seascapes
Creating a serene atmosphere in seascape photography requires the ability to capture and communicate the stillness, calm and tranquility associated with the sea. Follow these techniques to make this goal tangible:
- Choose the perfect moment : Serenity is often linked to moments of quiet and sweet atmospheres. Plan your shots during the golden hours, at sunrise or sunset. In this period, the light is soft, warm and enveloping, helping to create a serene atmosphere. The absence of strong shadows and the striking colors of the sky contribute to the overall sense of calm in your images.
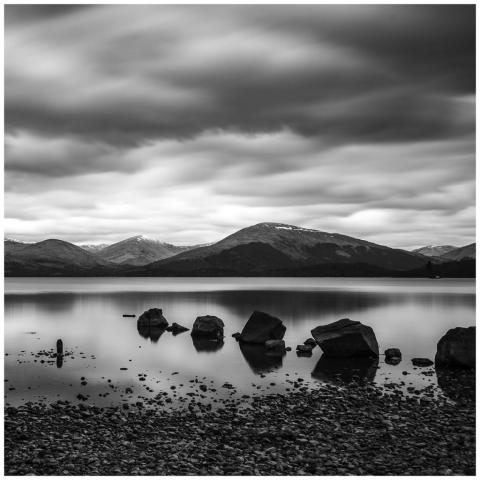
- Look for calm waters : Direct your lens towards areas where the water is placid, such as sheltered bays or lagoons. Calm waters generate soft reflections and a sense of stillness, intensifying the feeling of serenity in your photographs. Experiment with long exposures to further smooth the water's surface, creating a dreamy, serene effect.
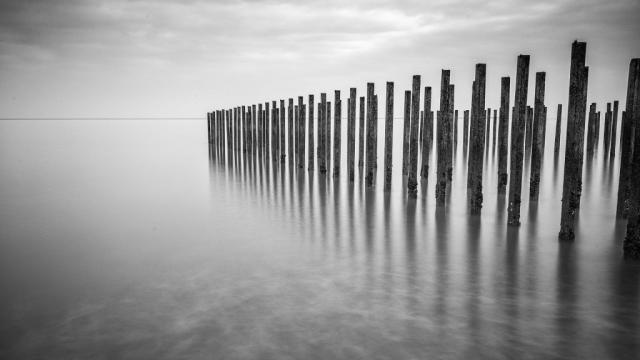
- Simplify the composition : Keep the composition clean and essential to evoke a feeling of tranquility. Eliminate distracting elements that could disturb the quiet atmosphere. Focus on a single main subject or focal point that conveys serenity, such as an isolated rock, a boat on calm water, or a distant horizon. A minimal composition allows the viewer to immerse themselves in the stillness of the scene.
- Use negative space
- Long exposure techniques
- Subtle colors and tones : Choose a muted color palette and soft tones to amplify the serenity in your seascape images. Pastel shades, soft blues and earthy shades can create a relaxed atmosphere. Pay particular attention to white balance, adjusting it to achieve the soothing color tones you desire.
- Include minimalist elements
- Capture emotional light : Focus on the quality of light in your seascape photographs. Soft, diffused light can help create a peaceful atmosphere. Capture the moments when the sun's rays gently illuminate the scene or when subtle light filters through the clouds. These episodes can evoke a sense of tranquility and serenity.
Remember that capturing a sense of serenity in seascape photography is about creating a visual experience that allows viewers to connect with the calm and tranquility of the scene. You can make your seascape images fascinating by carefully considering the right moment, composition, colors and light.
Turn your seascape black and white
The use of black and white in seascape photography can be a powerful artistic choice, adding depth, drama and a timeless aura to images. Here are some ways black and white can enrich seascape photography:
- Emphasize texture and contrast : Black and white photography allows you to focus on the textures and patterns in the scene, such as rippling waves, rocky cliffs, or clouds in the sky. By eliminating color distractions, you can create rich contrasts that enhance the visual impact of the image.
- Improves mood and atmosphere : Black and white images evoke emotions and generate a sense of drama. By eliminating colors, you can emphasize the mood and atmosphere of the scene, capturing, for example, the menacing nature of a turbulent sea or the serenity of a calm, peaceful coast.
- Simplify the composition : Removing color simplifies the composition, focusing on the essential elements within the frame. By allowing your eye to wander between light and shadow, leading lines and overall composition, you can achieve a more striking and impactful photograph.
- Overcome difficult lighting conditions : Conversion to black and white can mitigate issues related to color casts or uneven lighting, common in seascape photography. Furthermore, it allows you to highlight the tonal range and highlight the play of light and shadow in the scene.
- Creates a timeless aesthetic : Black and white photography has a classic quality that adds a touch of nostalgia or timelessness to images. By removing the distraction of contemporary color, you can make the image more artistic and long-lasting.
When choosing to use black and white in seascape photography, carefully consider the elements of composition, light, texture and contrast to create visually appealing images. Experimentation and practice will guide the development of your artistic eye, helping you recognize scenes suitable for conversion to black and white and make the most of them.
Choose a minimal artistic approach
Taking a minimal artistic approach to seascape photography can lead to stunning, evocative images, emphasizing simplicity, balance and a sense of tranquility. Follow these tips to get this unique combination:
- Simplify composition : Minimalism reduces elements to their essential forms, creating a sense of visual simplicity. Capture clean and tidy scenes, eliminating any distracting elements and focusing on the key aspects that define the essence of the scene.
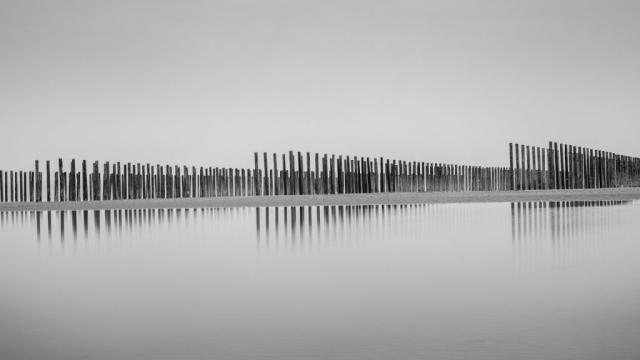
- Embrace symmetry and balance : Minimalism often favors symmetry and balance in compositions. Take advantage of opportunities to capture reflections in still water, where the horizon line or other elements can be perfectly centered. Symmetry adds harmony and a contemplative touch to your images.
- Pay attention to lines and shapes : Look for strong lines, curves, or geometric shapes in the seascape. These elements can guide the viewer's eye, creating a sense of flow or rhythm in the image. Experiment with shoreline, dock, or wave leading lines to guide the eye across the frame.
- Look for minimalist color palettes : Minimal artwork often adopts muted or limited color palettes. Go for pastel shades or monochromatic scenes that enhance the minimalist aesthetic. Minimal variations in tone can add depth, maintaining a feeling of serenity.
- Use long exposure techniques : Long exposures can be especially effective in minimal seascapes. Extend exposure times with neutral density filters to achieve subtle effects on water and further simplify the scene, focusing attention on the essential elements.
- Experiment with minimalist editing : Take a minimalist editing approach. Keep adjustments subdued to preserve the simplicity and serenity of the scene. If necessary, optimize tones, contrast and sharpness, avoiding excessive manipulations that can distract from the minimalist aesthetic.
- Explore black and white conversion : Black and white conversion can enhance minimalist and artistic qualities. This technique emphasizes shapes, textures, and tonal range, allowing the viewer to focus on the composition and form.
Remember that combining seascape photography with minimal art is an artistic process. The style and approach may vary based on your personal preferences and creative vision. Develop your own unique style, experiment with different techniques and create images that reflect your artistic expression, exuding calm and visual impact.
Merge multiple images for an exceptional result
This advice may not suit everyone, unless you use advanced tools like Adobe Lightroom, Adobe Photoshop, or advanced photo editors like Luminar Neo that allow the use of layers and masks. However, it can make a noticeable difference to your seascape photography.
Dealing with the dynamics of the wave implies knowing how to manage constantly evolving elements. Usually, in your composition you will not find a single wave, but rather a whole. Capturing every moment in its optimal state can be extremely challenging.
A widely adopted technique to overcome this challenge is to capture multiple images of the same composition. By photographing dozens of exposures, you're likely to be able to capture beautiful waves in multiple areas.
For example, one image might capture the perfect texture of water in the foreground, another might feature a dramatic wave in the center, and a third might portray spectacular foam on a distant rock.
By combining these three images, you will get a "perfect" shot, which would otherwise have been difficult to obtain.
Be creative and think outside the box
The targeted use of blurs and motion blur can lead to creative and surprising results. Motion blur can be used in different ways. Photographing moving subjects in the landscape with slow shutter speed, such as clouds and waves moving across the image.
Alternatively, with a static subject, you can move the camera while shooting. Move your device up or down while pressing the shutter button, or move it from left to right or vice versa. In all these cases, it is an intentional camera movement (ICM) rather than an unwanted camera movement.
A creative idea is to combine two images of the same scene: one completely blurred and one without blur. With the help of masks in Photoshop, you will be able to highlight sharp elements.
Panning (moving the camera horizontally) with moving objects or animals can produce exciting images. This way, the background will be blurred while the object you are following will be clearer. If you want straight lines or stripes, do this on a tripod. If you do it manually, add a natural movement.
Camera cleaning and protection equipment
As you get closer to the ocean, it's inevitable that your lens will soon be covered in sea spray. While a little water on the front of your lens or filter might seem harmless, it could compromise the quality of your images with unwanted smudges, halos, or reflections.
That's why it's essential to have a couple of microfiber cloths on hand. This accessory should always be part of your photographic equipment.
After some cleaning, you may notice that the salt water has started to stain the lens or filter, making the image blurry and unclear. In situations like this, it is useful to use pre-moistened wipes specifically for lenses or, if necessary, bring a bottle of water with you. However, be very careful to keep your lens and filter clean to preserve the quality of your photographs.
When using cloths to clean the lens, carefully check the fabric for grains of sand. Even the smallest speck could cause annoying scratches on the lens.
Depending on the conditions, consider further protecting your camera. You can do this with protective skins or plastic rain covers, or by using an umbrella. Please note that umbrellas may be impractical in windy conditions.
Conclusions
Seascape photography offers a unique opportunity to capture the beauty, power and serenity of the sea along with its surrounding environment. These shots highlight the dynamism of light, reflections, textures and patterns, generating captivating compositions. The images convey a sense of peace, escape and a wide range of emotions and atmospheres. Seascape photography allows viewers to appreciate the ever-changing nature of the sea and its entanglement with the land.
I hope the suggestions I have provided will be an invaluable guide to obtaining extraordinary photographs of the sea and fully enjoying your outdoor adventures.
When you subscribe to the blog, we will send you an e-mail when there are new updates on the site so you wouldn't miss them.
About the author
By accepting you will be accessing a service provided by a third-party external to https://www.insightadv.it/


Comments