
How to get dramatic light in portraits
Scrolling through Instagram, it's hard not to notice how attention-grabbing portraits are often those imbued with suggestive and dramatic lighting.
If you're a portrait photographer, light management can completely transform the atmosphere of a shot. But intense and dramatic lighting isn't just about aesthetics or glamour; it's the key to conveying deep emotions and intentions.
If this photographic style is what you want to focus on, and you're wondering how to achieve extraordinary lighting, then you're in the right place.
This article is a treasure trove of lighting photography tips designed for both beginners without specialized equipment and more experienced photographers looking to master this technique with different types of gear.
Aside from providing detailed tips, we'll offer numerous visual examples to showcase various techniques and, most importantly, to keep you inspired on your creative journey.
Let's dive in!
What is Dramatic Lighting?
Dramatic lighting draws inspiration from the artistic technique of chiaroscuro, born in the Renaissance and leaving its mark on numerous artists up to the present day. This technique is widely used in portrait photography, taking cues from famous works by artists like Annie Leibovitz and Robert Mapplethorpe.
Its goal is to create atmosphere and depth through bold contrast between lights and shadows, accentuating volume and emphasizing key elements.
There are several light characteristics to consider:
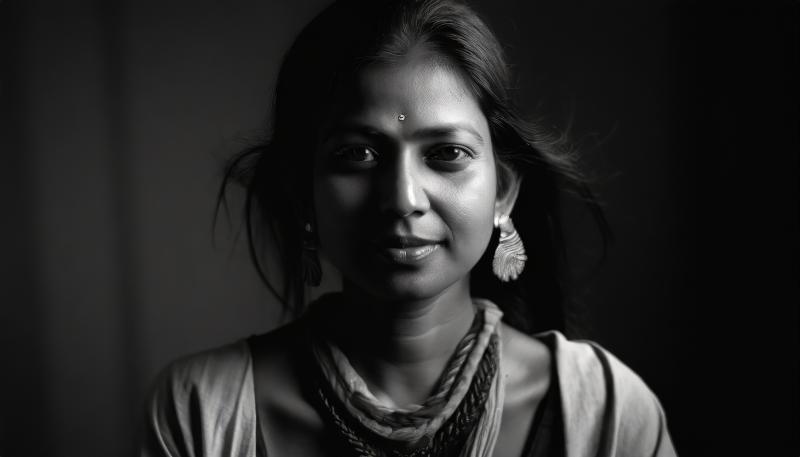
Brightness: Refers to the intensity of light. Extreme contrast between very bright and darker areas is fundamental to create dramatic lighting, as seen in shots with low tones.
Contrast: When the light source hits the subject from the same angle, it creates hard light, characterized by pronounced and defined shadows.
By using one or a combination of these concepts, you can create a wide range of effects for dramatic portraits.
Let's explore some ways to achieve this.
7 Ways to Create Dramatic Lighting
If you're still wondering, "How do I get dramatic lighting?" here are 7 fun ways to try recreating studio-like dramatic lighting in the comfort of your home.
1. Utilize Intense Natural Light
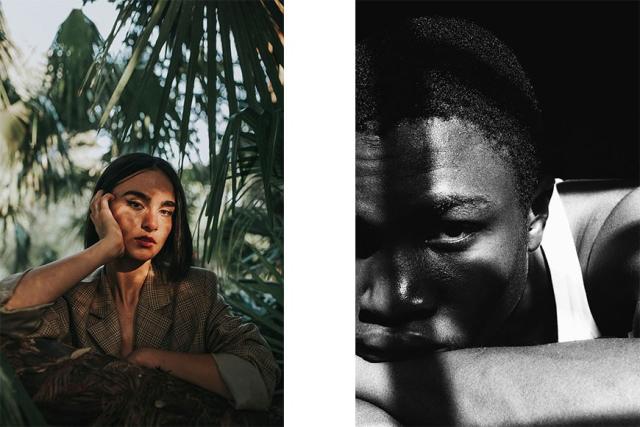
As mentioned earlier, a high-contrast light source that illuminates the subject from the same angle, like direct sunlight, is what you need for dramatic lighting. You might have heard that you should never shoot portraits at noon on a sunny day because it creates strong shadows, right?
Well, that's precisely what you need when aiming for dramatic lighting! You just need to be creative to capture a good dramatic portrait.
For instance, play with light filtered through leaves or leverage natural light from a window during the day.
On a sunny day, the light is direct and intense, creating dark and well-defined shadows.
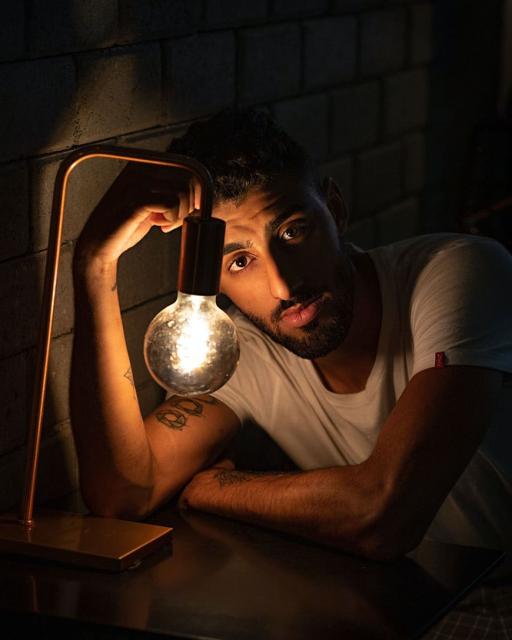
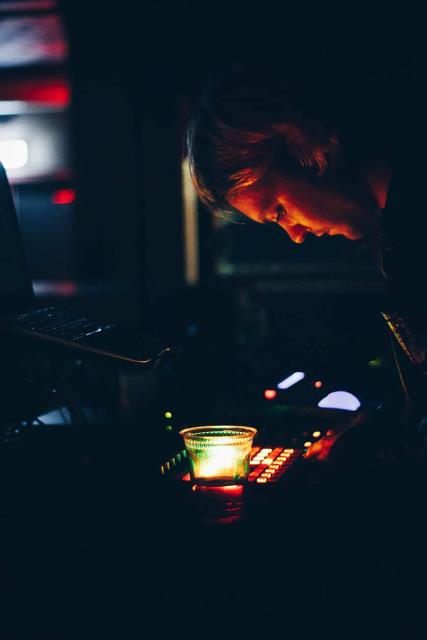
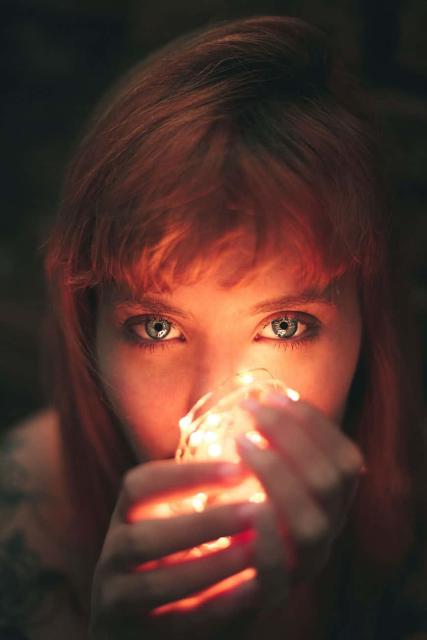
2. Create Artificial Intense Light
Artificial lights, such as desk lamps, electronic devices, or professional flashes, can be manipulated to achieve intense light effects, ideal for visually impactful portraits.
Here are some ideas for inspiration.
Use desk lamps or a light bulb.
Utilize a computer, TV, phone, or any device emitting light.
Use string lights.
Utilize flashes or strobe lights for a professional studio portrait.
The use of intense light can be particularly effective when aiming to create tension in genres like fitness photography, where hard lights and shadows can define the model's muscles.
Use Streetlights
Just because it's artificial light doesn't mean you have to create or control it.
You can also use available light in a particular scene, such as streetlights.

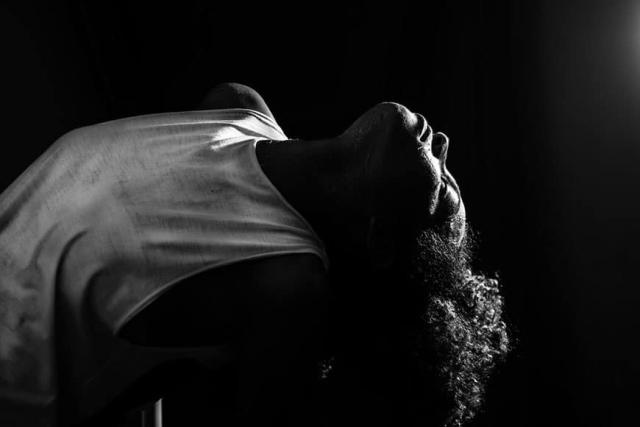
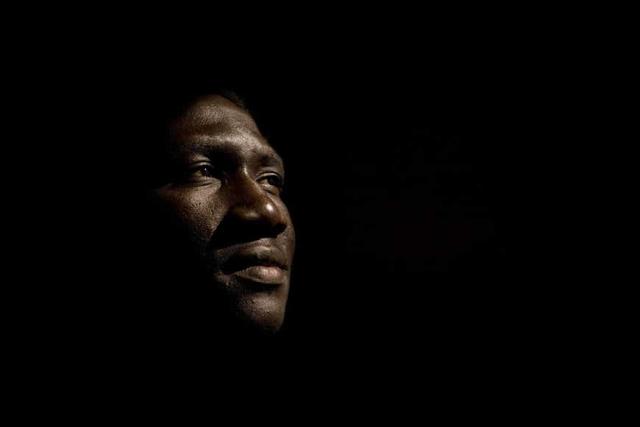
3. Shift the Light Direction
By moving the light source, you can achieve different effects. For instance, positioning the light behind the subject creates a sort of contour that adds emphasis. Experimenting with various light angles can yield unique results. Here are some of the most common.
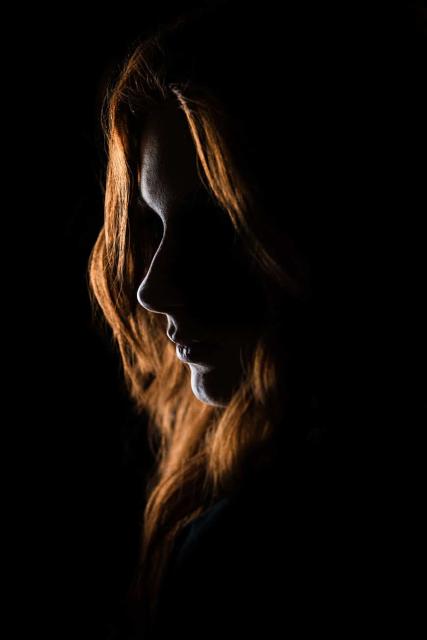
Backlighting
When you position the light behind the subject, you create a rim light that forms a very strong highlight.
If left as the only light source, you'll create a silhouette effect like the example below.
However, if you want some detail on the subject, you can place a reflector or a second light with less power in front.
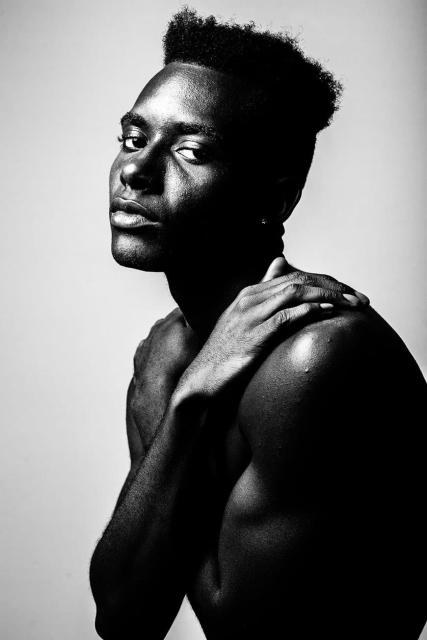
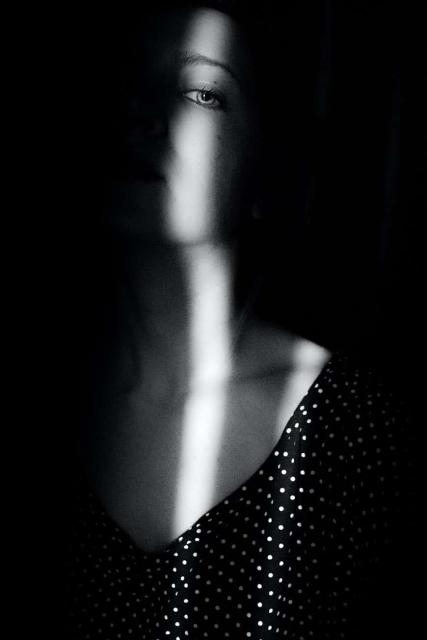
Side Lighting
You can use just one light to illuminate your subject on one side but not the other.
To intensify the effect, you can add some negative fill on the opposite side (you can learn how to do this with a lighting modifier in tip number 4).
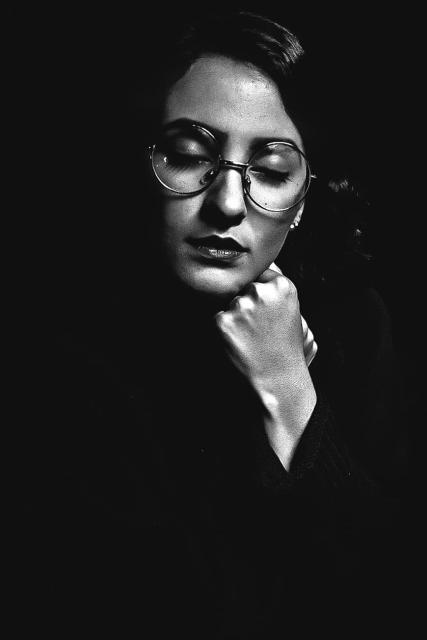
45 Degrees
One of the most popular lighting techniques for portraits is positioning the light at a 45-degree angle to the subject.
This means it should be slightly from the side and above the head.
If the background is too close, you might see the subject's shadow. To avoid this, you can separate the subject from the background or use a black backdrop.
Frontal Lighting
Depending on whether you use a modifier or not (see below), frontal lighting can produce dramatic results: intense light from a source like a bare flash or the sun after noon creates strong lights and shadows.
4. Choose the Right Light Modifiers
Just because most flashes create strong light without using any modifiers doesn't mean you can't use them to shape and direct light: you just need to know which modifiers to use.
Honeycombs
This accessory attaches in front of the flash to direct the light. As the name suggests, it's a honeycomb-shaped grid that narrows the beam of light. They come in different degrees: the smaller the degree, the narrower the light.
Snoot
This is a cylinder or cone-shaped attachment that can be placed on any light source to focus the beam. In other words, it provides a smaller circle of light. It gives sharper edges compared to the honeycomb.
Barn doors
When you put a barn door on your light, you can prevent light from going in a particular direction. Each door functions like a flag blocking the light. They are used to prevent spills.
Flags
Flags work like barn doors, except they're entirely independent. They're large sheets of opaque material that block light.
They can also be used for negative fill. This means you can place them on the opposite side of a lamp to absorb light and prevent it from bouncing onto the subject.
Umbrella
Controlling light from an umbrella can be tricky, as it usually works to diffuse light evenly onto a subject. However, used together with flags, an umbrella can still contribute to creating dramatic lighting.
Photographers can use an umbrella as a shooting tool or a reflective device: most allow both simply by removing the cover.
Softbox
Similar to the umbrella, light tends to 'leak' more from a softbox, making it harder to control: this is where flags come into play.
5. Manage Exposure to Highlight Focal Points
Since dramatic light is highly contrasted, it will be challenging for your camera to reproduce it accurately in automatic mode.
This is because, by default, your camera will read the light from the entire scene and come to an average. As a result, you'll have underexposed highlights and overexposed shadows, compromising the contrast you were creating.
To achieve the correct exposure in dramatic lighting conditions, you need to take control of the camera settings. Otherwise, you'll end up with a bland photo instead of a dramatic portrait.
I'll explain how to get the correct exposure using manual and semi-automatic mode: this way, you can choose based on your skill level.
The first thing you need to do is set the camera to spot metering mode. This tells it where to gather information to measure available light.
In most cameras, spot metering mode measures the area at the center. So, once set, position the bright areas of your photo in the center of the frame (you'll worry about framing later).
Then, half-press the shutter to see the measurement.
Start by setting ISO 100: this avoids any noise. Then, choose the right aperture based on the desired depth of field.
Finally, adjust the shutter speed until you have the exposure meter in the middle. Ensure it's not slow enough to cause camera shake.
Once you have the right camera settings, you can reframe the scene and take the shot. When you do, you'll have well-exposed highlights while the rest will have deep shadows.
If you're not comfortable using the camera in full manual mode, you can opt for any semi-automatic mode and adjust the exposure using compensation.
For example, setting the camera to P mode, the camera itself will decide the optimal aperture and shutter speed. Take the first picture to assess its appearance.
If you feel the atmosphere isn't as desired due to insufficiently dark shadows, apply exposure compensation of -1 or -2 steps.
Does exposure compensation affect Raw files? Absolutely not, as exposure is determined by the parameters already selected (during shooting) such as aperture, shutter speed, and ISO.
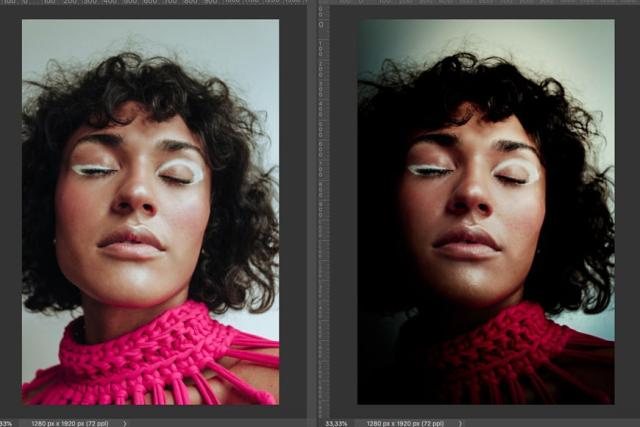
6. Enhance Your Portraits for More Dramatic Lighting
Post-processing is a crucial aspect of achieving dramatic lighting: it's akin to developing film. You can do this using any photo editing software (for demonstration purposes, I'll use Lightroom).
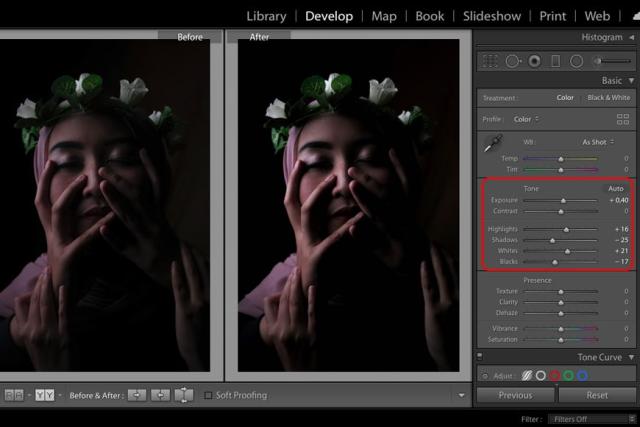
The goal is to get an image with strong contrast, and that's what you aim for with post-processing. The simplest way is adjusting the Contrast slider by increasing it, although this may limit control.
Instead, it's advisable to use individual sliders. Increase highlights and whites to brighten the light parts of the image.
Then, reduce shadows and blacks to darken them. The exact amount depends on each photo and your personal style.
Another option is using the tone curve. It provides maximum control but can be more complex to use. If you feel confident using this tool, proceed.
7. Create Dramatic Lighting in Photoshop
If you shoot in RAW format, which I highly recommend, you can make some adjustments like reducing exposure and increasing contrast, pushing highlights and whites, and darkening shadows. In the case of a JPEG image, you can use the Camera Raw filter.
You can also add a slight vignetting effect to darken the edges: some photos will benefit from it, others won't, so it's advisable to experiment.
Accept the changes and open the image in Photoshop. Then, add a new layer and change the blending mode to Soft Light. Here, you can paint black to darken areas and white to brighten them.
You can also apply a gradient effect to simulate directional light.
This represents the main process, but you can add further touches to this base. For example, you can perform contrast masks and burnishing to increase facial contrast.
You can do this by adding a Curve adjustment layer to brighten the image. Then, mask the layer and paint only on the parts to brighten.
Finally, add a second Curve adjustment layer and darken the image to burn specific areas. You can also use the Dodge tool to apply adjustments only in a specific tonal range.
Eventually, you can apply some color tones by adding a color lookup adjustment layer or perform some split toning.
Are contrast masks and burning necessary for all photos? Absolutely not, but they can still help enhance the effect of your portraits if used in moderation.
Conclusions
I hope these techniques for improving the lighting in your portraits have been helpful. Creating dramatic lighting can truly add a special touch to an otherwise ordinary portrait, so I encourage you to try it out.
When you subscribe to the blog, we will send you an e-mail when there are new updates on the site so you wouldn't miss them.
About the author
By accepting you will be accessing a service provided by a third-party external to https://www.insightadv.it/


Comments